On-premise installation
For an on-premise installation you will need a server which can run docker and docker_compose. For windows servers, installation of docker_compose might be difficult see: https://docs.docker.com/compose/install/ (opens in a new tab) .
Prerequisites to Dessia’s platform installation
-
The user must have access to persistent Administrator rights on his computer in order to install docker engine and docker desktop on his computer
-
The user need to install WSL with the docker install
wsl --install
wsl --version
Deployment without internet connection
For deployment without an internet connection, follow these steps:
Step 1: Install Docker
-
1.1: Without Internet Connection
-
Launch the Docker Desktop Installer: Docker Desktop Installer.exe.
-
Ensure that the WSL installation is activated and install Docker with the recommended configuration.
-
Verify the installation of both Docker Desktop and Docker using commands on the command line terminal.
docker
docker --version
-
Step 2: Load Images and Check Loading
-
Use the command line terminal to load the necessary images using the following commands. NB: Think about changing images names depending on the real image file names. For example, if backend file is named “dessia_backend_stable.tar”, change “backend.tar” for “dessia_backend_stable.tar”.
docker load -i backend.tar docker load -i frontend.tar docker load -i mariadb.tar docker load -i mongo.tar docker load -i pypiserver.tar -
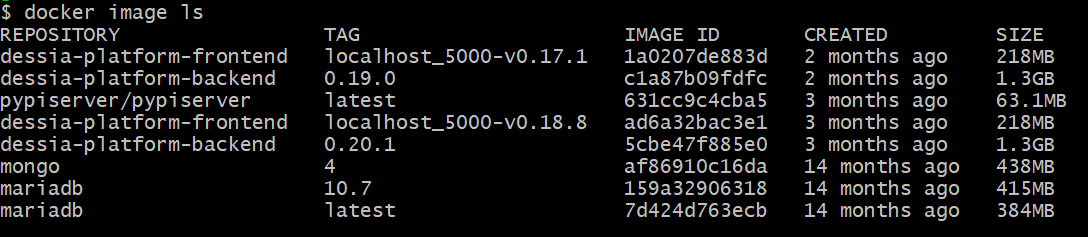
Check if all the required images are loaded using the following command in your terminal:
docker image ls
docker info
You may obtain such a result (image names, tags and ids are given as example here):
-
If at least one of these lines shows a
<none>value (as illustrated below), follow the following process:
- Identify through the image names, the repository for which name and tag are missing. Copy in your clipboard the corresponding image id (in the example above, it’s: 8d197fdf5126)
- Enter the command below in your terminal with the following details:
- image_id: Paste the image id identified above
- new*name: Choose an easy name to identify the repository *(for example: backend or frontend, etc.)_
- new*tag: Choose an easy tag to identify *(for example: version number or “latest”)_
docker tag "image_id" "new_name":"new_tag" "As an example: docker tag 8d197fdf5126 dessia_backend:latest"-
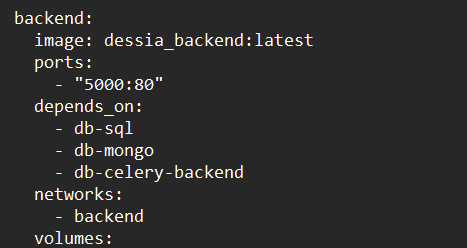
Report the name and tag you’ve just entered in the corresponding repository in the docker-compose.yml file (as illustrated below for the example described above):
-
Repeat the process for each repository concerned with the
<none>value before continuing the installation. -
Check that everything is alright by entering once again the following command line in your terminal
docker image ls
Step 3: Copy to Deploy Folder
- Copy the Docker Compose YML files and the my.cnf file to the designated deployment folder. Ensure this is not a temporary folder.
Step 4: Start Services
4.1: Without Internet Connection
Before executing the following command, ensure that the names and tags of the images you provided in the docker-compose.yml file match the names and tags of the images you have loaded.
docker image ls
REPOSITORY                             TAG                          IMAGE ID       CREATED         SIZE
dessia-platform-frontend               localhost_5000-v0.18.8       dbbbd3f196a2   22 hours ago    173MB
dessia_platform_front                  v0.18.8                      dbbbd3f196a2   22 hours ago    173MB
registry.dessia.ovh:5000/dessia-back   stable-v0.20.2-2-g7253802d   1392942b1312   12 days ago     1.21GB
dessia_platform_back_end               v0.20.2                      1392942b1312   12 days ago     1.21GB
pypiserver/pypiserver                  latest                       631cc9c4cba5   2 months ago    63.1MB
mongo                                  4                            af86910c16da   14 months ago   438MB
mariadb                                10.7                         159a32906318   14 months ago   415MB
mariadb latest 7d424d763ecb 14 months ago 384MB-
Run the deployment command without an internet connection using:
docker-compose -f docker-compose.yml -f docker-compose.no-network.yml up -d
Step 5: Put PyPi Packages (only without internet connection)
-
Copy all files from the 'pypi-packages' folder into the dedicated volume path: NB: Copy directly the files (not the folder containing the files) in the path
\\wsl$\docker-desktop-data\data\docker\volumes\*actual_folder_name_pypi-packages*\_data -
Replace 'actual_folder_name_backend-packages' with the correct folder name ending with '_pypi-packages' (actual folder name is the same name with the directory where you put your docker images, docker_compose.yml …).
Step 6: Start the Platform, Create Your Account, and Load Dessia_Common
- Start the global container and navigate to the frontend page.
- Create your platform account. As the first user to create an account, you will automatically be assigned the Admin role.
- Load your 'dessia_common' wheel file in ADMIN/Applications and restart the platform.
- On the ADMIN page, verify if 'Dessia_Common' has a green illuminated button, indicating successful loading and activation.
- Load all the other wheel files (one by one starting with volmdlr and plot_data) in the platform. Restart the platform for each step.
Troubleshooting
If encountering issues during deployment, consider the following troubleshooting steps:
-
Verify the installation steps for Docker, ensuring correct configuration and dependencies.
-
Check if all required images are properly loaded using the 'docker image ls' command.
-
Ensure that files are correctly copied to the deployment folder.
-
Verify the command used for starting services matches the intended configuration.
-
Confirm the correct path and placement of PyPi packages without internet connection.
-
Check for any error messages or logs provided by Docker or related commands
docker container ls
docker container logs container_id (container_name)