Volmdlr - basic use
1 - Introduction
Volmdlr is DessIA Volume Modeler. It allows you to display 2D and 3D elements in your browser thanks to Babylon display. In this tutorial, you will try to generate some features proposed by our Volume Modeler.
Volmdlr is object oriented approach, that it to say, you create objects and you create link between them in order to have a new object that has its own characteristics.
2 - Volmdlr approach
We will create a Contour2D which will be extruded.
2.1 - Packages required :
Before beginning, if you want to create 2D and 3D elements, you have to import different packages that are used to generate what you want. If you have read Get Started section, you should have volmdlr package already installed in your computer, otherwise you should installed it :
pip install volmdlr
In this tuto, you will need these packages :
import volmdlr as vm
import volmdlr.primitives2d as p2d
import volmdlr.primitives3d as p3d
import plot_data.core as plot_data
from dessia_common.core import PhysicalObject
from typing import List
If some of them are missing, install them with pip install NameOfPackage
2.2 - Sketch creation :
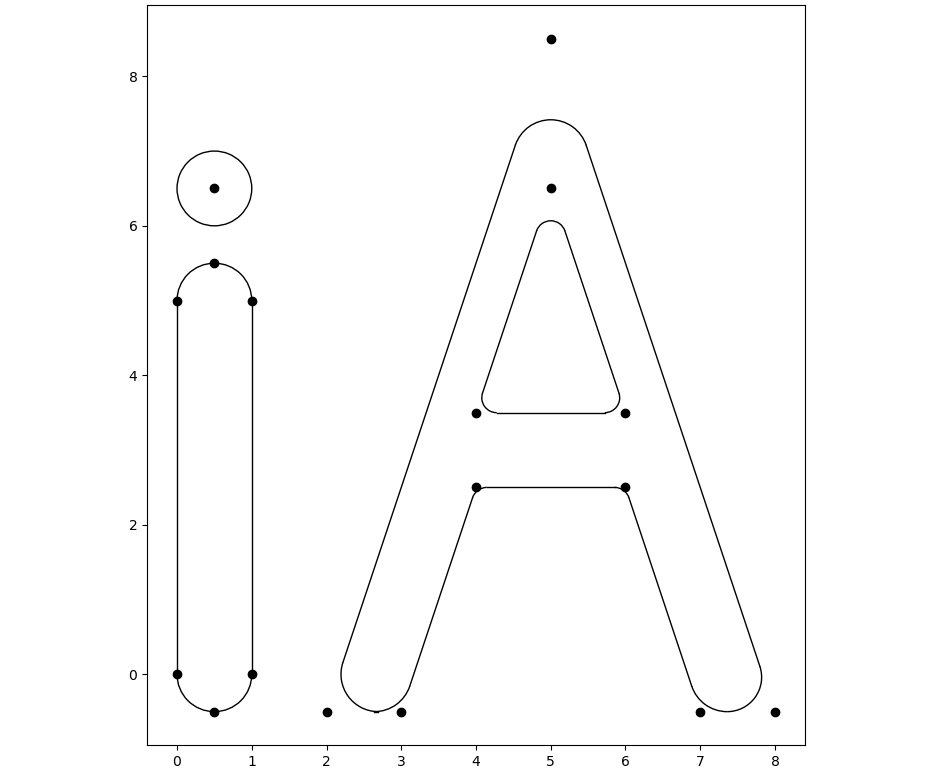
Once packages installed, we can begin. We will place point in order to display i and A letters. We will create a base in 2D.
How to create a point ?
You can create points (2D or 3D) with volmdlr giving their coordinates.
point_2d = vm.Point2D(x,y)
point_3d = vm.Point3D(x,y,z)
We propose you one sketch for each letter by clicking on the arrow below.
Letters sketch:
### Letter i

pointA = vm.Point2D(0, 0)
pointB = vm.Point2D(0, 5)
pointC = vm.Point2D(0.5, 5.5)
pointD = vm.Point2D(1, 5)
pointE = vm.Point2D(1, 0)
pointF = vm.Point2D(0.5, -0.5)

pointG = vm.Point2D(0.5, 6.5)

### Letter A

point1 = vm.Point2D(2, -0.5)
point2 = vm.Point2D(5, 8.5)
point3 = vm.Point2D(8, -0.5)
point4 = vm.Point2D(7, -0.5)
point5 = vm.Point2D(6, 2.5)
point6 = vm.Point2D(4, 2.5)
point7 = vm.Point2D(3, -0.5)

point_1 = vm.Point2D(5, 6.5)
point_2 = vm.Point2D(6, 3.5)
point_3 = vm.Point2D(4, 3.5)
After that, we need to create links between theses points. We can link them with LineSegment2D, Arc2D of by using a volmdlr method.
How to create links ?
In this case, we will explain you how to use certain link.
linesegment2d = vm.edges.LineSegment2D(pointA, pointB) #It creates a segment from A to B
arc2d = vm.edges.Arc2D.from_3_points(pointB, pointC, pointD) #It creates an arc thanks to 3 points, from B to C to D. They are arc points.

closedlinesegment2d = p2d.ClosedRoundedLineSegments2D(list_point, radius_between_points, True) #list_point is the list of point linked and radius_between_points is a dictionary where you inform a radius between two points ({0: 0.5, 1: 0.1}, points 0 and last point are link with a radius of 0.5, points 1 and 0 by a radius of 0.1)
We propose you one link type for each letter by clicking on the arrow below.
Letters linked points:
### Letter i

line_AB = vm.edges.LineSegment2D(pointA, pointB)
arc_BCD = vm.edges.Arc2D.from_3_points(pointB, pointC, pointD)
line_DE = vm.edges.LineSegment2D(pointD, pointE)
arc_EFA = vm.edges.Arc2D.from_3_points(pointE, pointF, pointA)

### Letter A
list_point_a = [point1, point2, point3, point4, point5, point6, point7] #exterior
radius = {0: 0.5, 1: 0.5, 2: 0.5, 3: 0.5, 4: 0.2, 5: 0.2, 6: 0.5}

list_point_int_a = [point_1, point_2, point_3] #interior
radius_int = {0: 0.2, 1: 0.2, 2: 0.2}

closed_a = p2d.ClosedRoundedLineSegments2D(list_point_a, radius, True)
closed_int_a = p2d.ClosedRoundedLineSegments2D(list_point_int_a, radius_int, True)
Once links created, you have to create a Contour2D using them. That is to say, you create an object that will know its primitives and primitives are links. There is an exception concerning CloseRoundedLineSegments because it is already considered as a Contour2D.
How to create Contour2D ?
primitives = [linesegment2d, arc2d, linesegment2d, arc2d] #List of links
contour = vm.wires.Contour2D(primitives)
Contour2D :
### Letter i
primitives = [line_AB, arc_BCD, line_DE, arc_EFA]
contour1 = vm.wires.Contour2D(primitives)

circle_frame = vm.Frame2D(pointG, vm.X2D, vm.Y2D)
circle = vm.wires.Contour2D.from_circle(vm.curves.Circle2D(circle_frame, 0.5))

### Letter A

#Nothing to do because CloseRoundedLineSegments is already considered as a Contour2D
How to display in 2D ?
You can have a first view of what you have done thanks to plot_data. Check the following code if you want to know how to do. If you want to lear more about plot_data, check our tutorials.
Display 2D contour :
plot_data_primitives = [p.plot_data() for p in primitives] #creation of primitives converted in plot_data objects
plot_data_primitives.append(contour1.plot_data())
plot_data_primitives.append(circle.plot_data())
plot_data_primitives.append(closed_a.plot_data())
plot_data_primitives.append(closed_int_a.plot_data())

primitive_group = plot_data.PrimitiveGroup(primitives=plot_data_primitives) #creation of a group primitives

plot_data.plot_canvas(plot_data_object=primitive_group) #display primitives thanks to plot_canvas
2.3 - Volume creation
Sketches are created, we can now create volume. To finish our example, we will create two extrusions and one sphere which will be i point needed.
How to create an extrusion and a sphere ?
To create an extrusion, it is really simple. You need to say where with what contour and it is almost done.
extrusion1 = p3d.ExtrudedProfile(frame, outer_contour2d, inner_contours2d, extrusion_length,
                                 name='extrusion1') #inner_contours2d is a contour2d list that informs where holes are. Also, the frame's w component specifies the extrusion direction.
sphere = p3d.Sphere(center, radius)
In our case, you will have all details below but you can try to define elements needed before watching the following code.
Volume :
height = 0.5
#Extrusion & Sphere

origin = vm.Point3D(0, 0, 0)
dir1, dir2 = vm.Vector3D(1, 0, 0), vm.Vector3D(0, 1, 0)
dir3 = dir1.cross(dir2)
extrusion_frame = vm.Frame3D(origin, dir1, dir2, dir3)
outer_contour2d = contour1
inner_contours2d = [] #No holes
extrusion_length = height
### Letter i

extrusion1 = p3d.ExtrudedProfile(extrusion_frame, outer_contour2d, inner_contours2d, extrusion_length, name='extrusion1')

axis_point = vm.Point3D(0.5, 6.5, 0.25)
sphere = p3d.Sphere(axis_point, 0.5)

### Letter A

extrusion2 = p3d.ExtrudedProfile(extrusion_frame, closed_a, [closed_int_a], extrusion_length, name='extrusion2')
Once our volume created, we can know display them. We will create a class that allows us to put all display in the same window, otherwise, each volume will appear in different windows.
Display class creation :
class Display(PhysicalObject) :
    def __init__(self, volume: List, name: str = ''):
        self.volume = volume
        PhysicalObject.__init__(self, name=name)
    def volmdlr_primitives(self): #It is very important to use this name
        return self.volume
You can use the following code to display what you have created :
volume = [extrusion1, sphere, extrusion2]
disp = Display(volume)
disp.babylonjs() #It is thanks to this methods that you can display in your browser