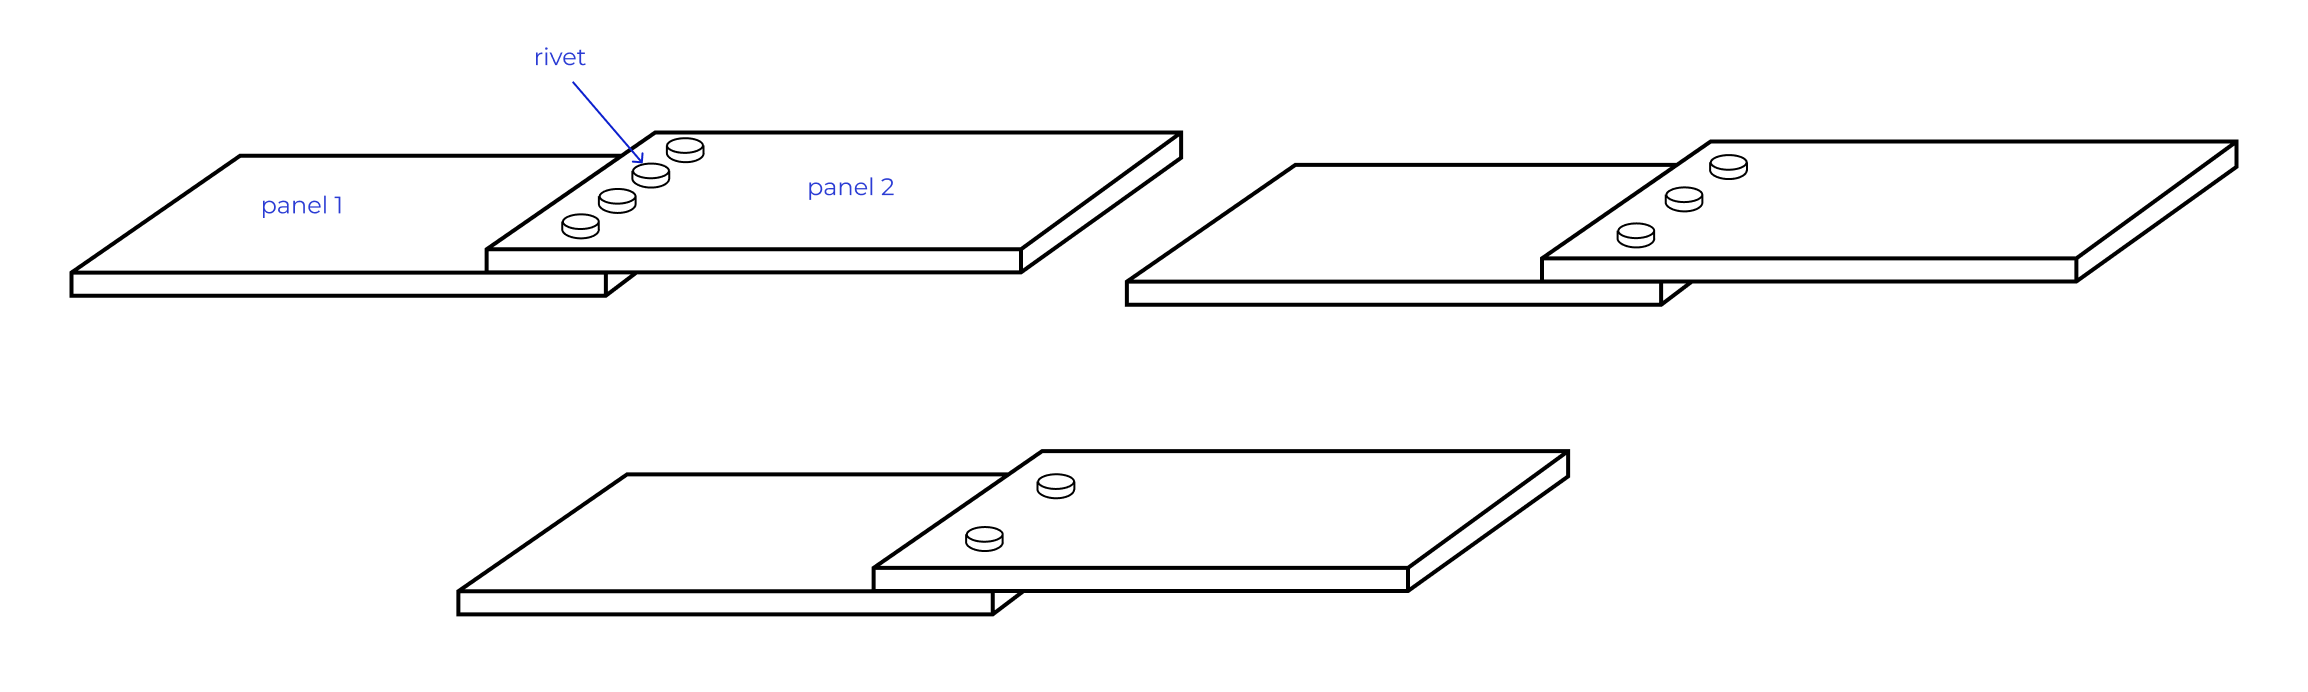
Begin with a simple riveted assembly
The objective is to build a simple bot to quickly introduce our mindset in bot development. The bot proposes to generate all connectable solutions based on rivet between two panels. The next figure shows this one system solved with 2, 3, and 4 rivets. But which is the best one? And how to generate all solutions?
1 - DessIA methodology
We suggest you cut the bot creation process into a functional phase and a development phase. To build a bot, you have to answer two questions:
- What is my pain point?
- How to build a bot?
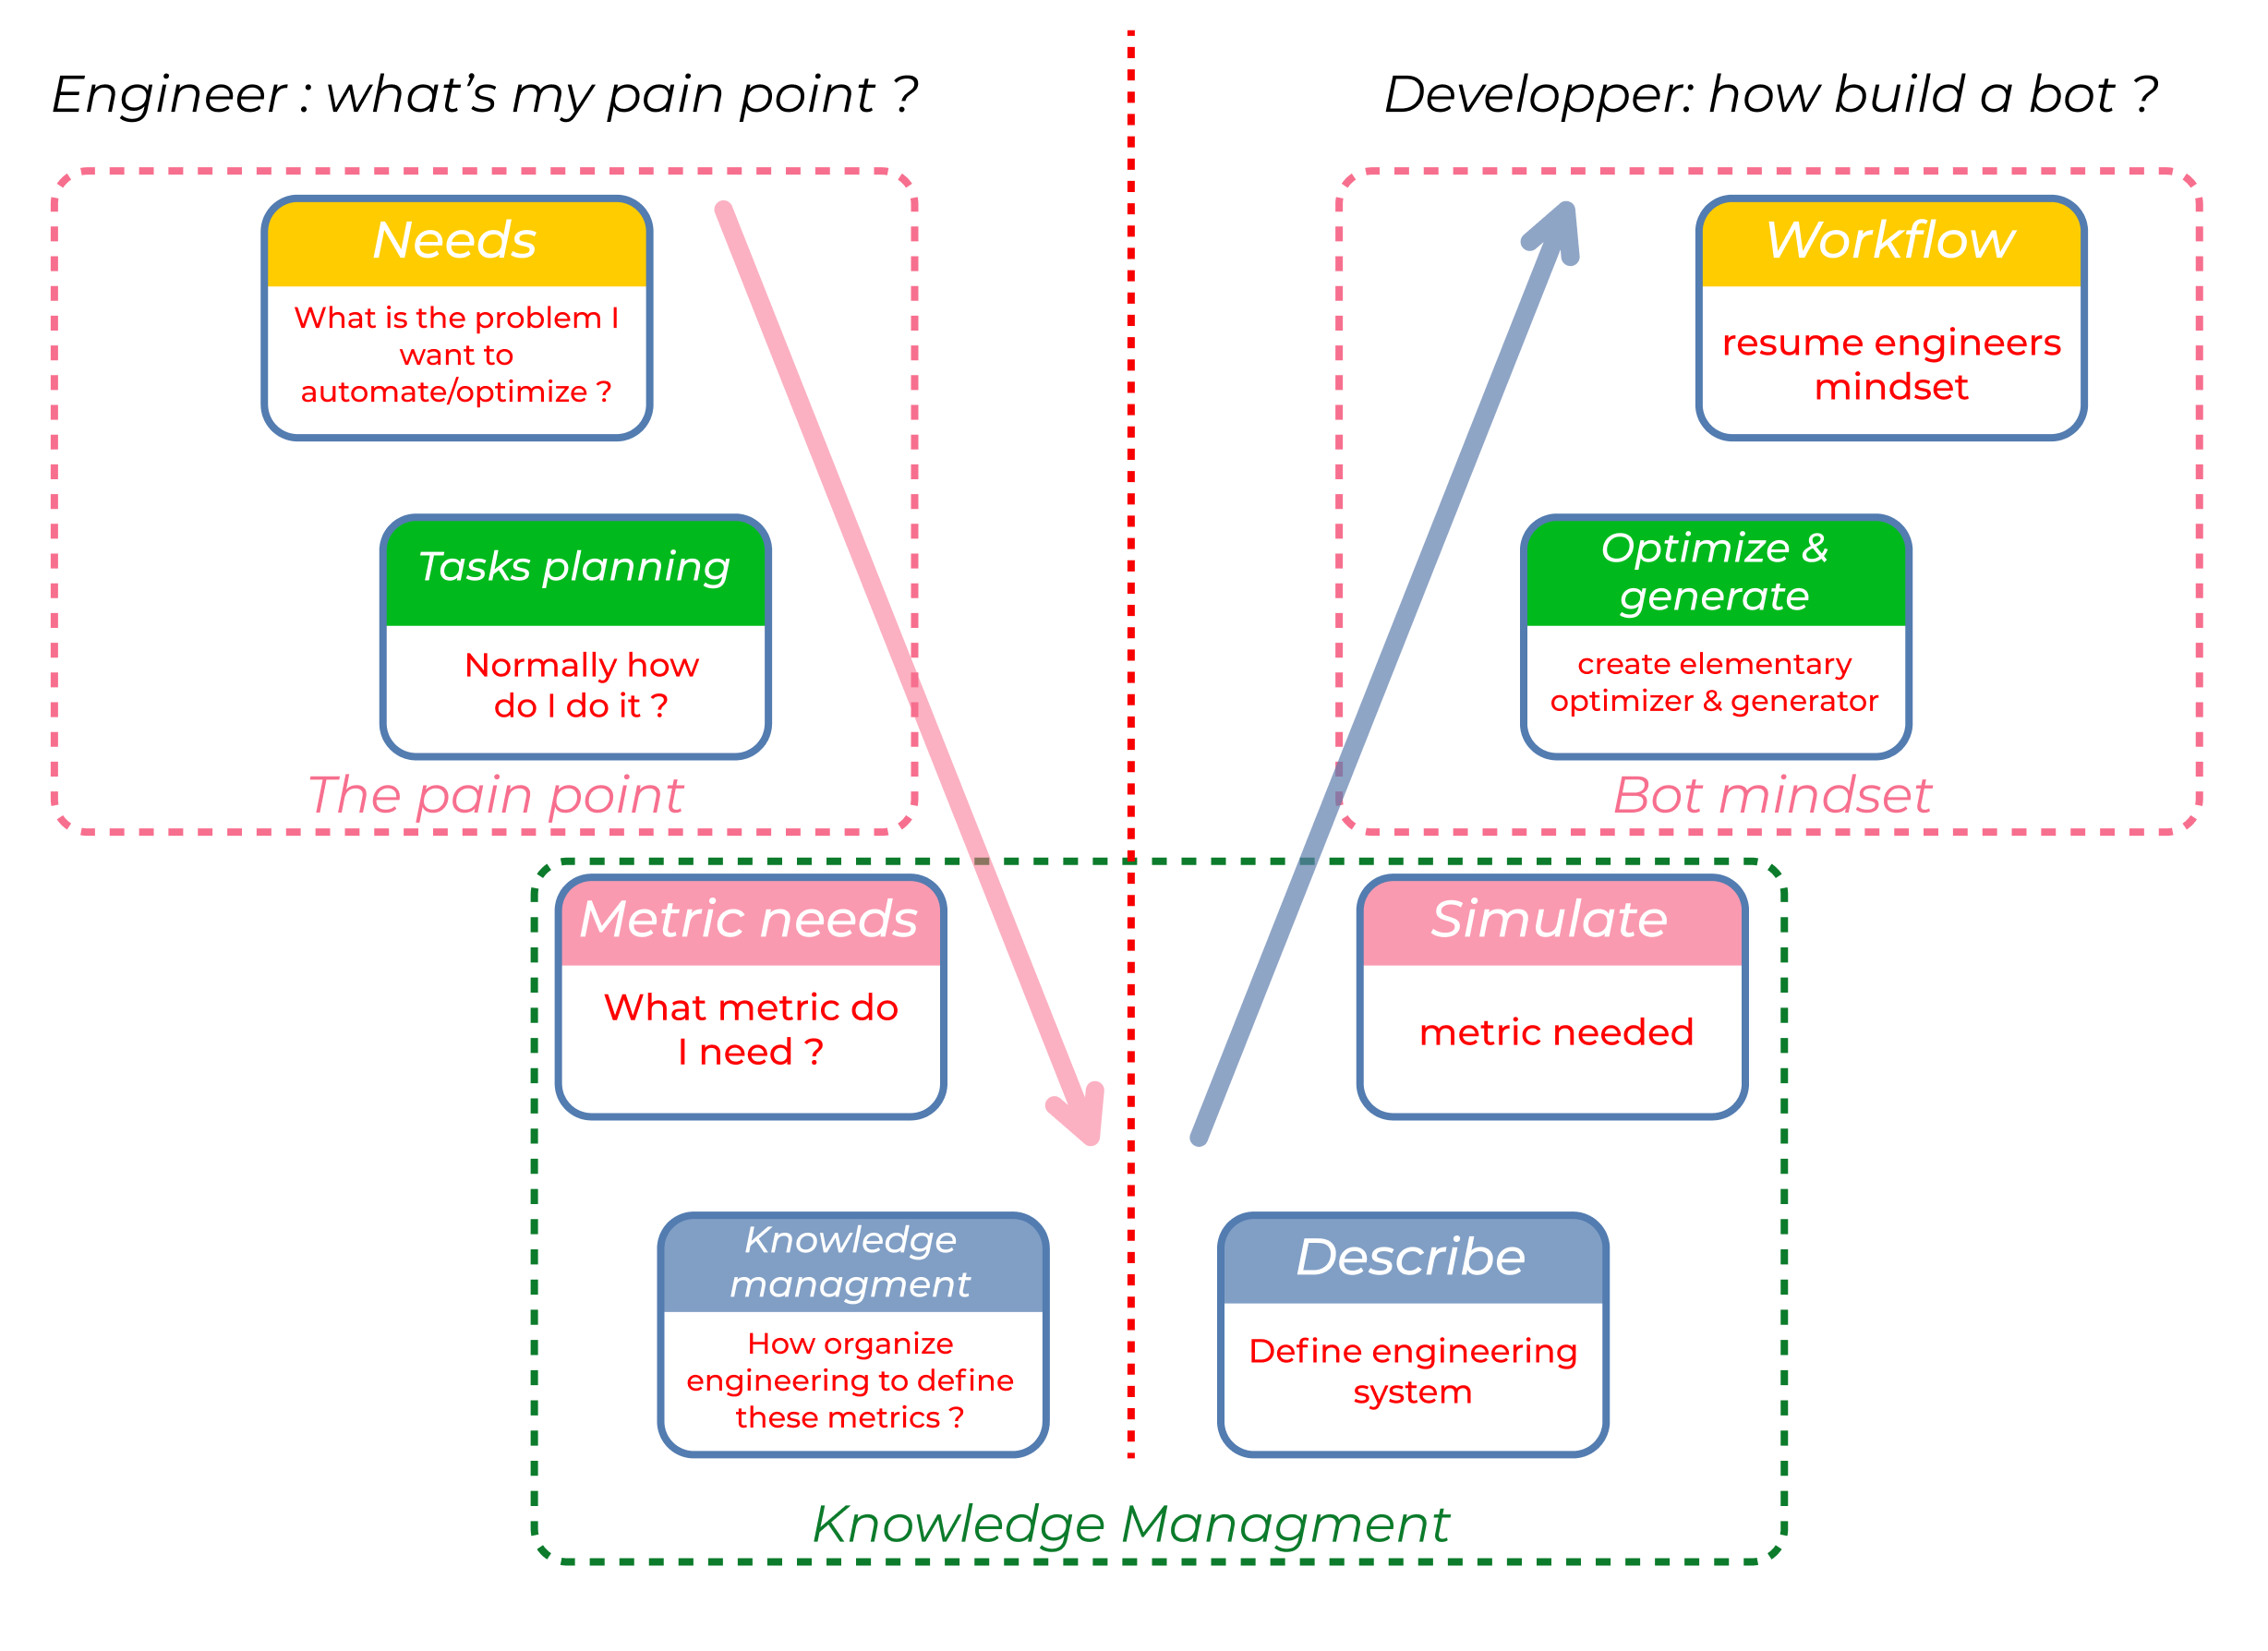
The first question can be answered by an engineer without any programming knowledge while the second phase must be done by a Python developer.
2 - Why a bot? What is my pain point?
We suggest you split this question into 4 sub-questions. The global mindset is to start from the big picture to the knowledge management. First of all, we need to detail our problem, and then to explain how we usually solve it, what are the metrics needed to do this work, and then how to organize the engineering system in order to estimate these metrics.
2.1 - What is the problem I want to automate/optimize?
With this simple rivet example, I want to generate all rivets and give their mass with an estimation of the price.
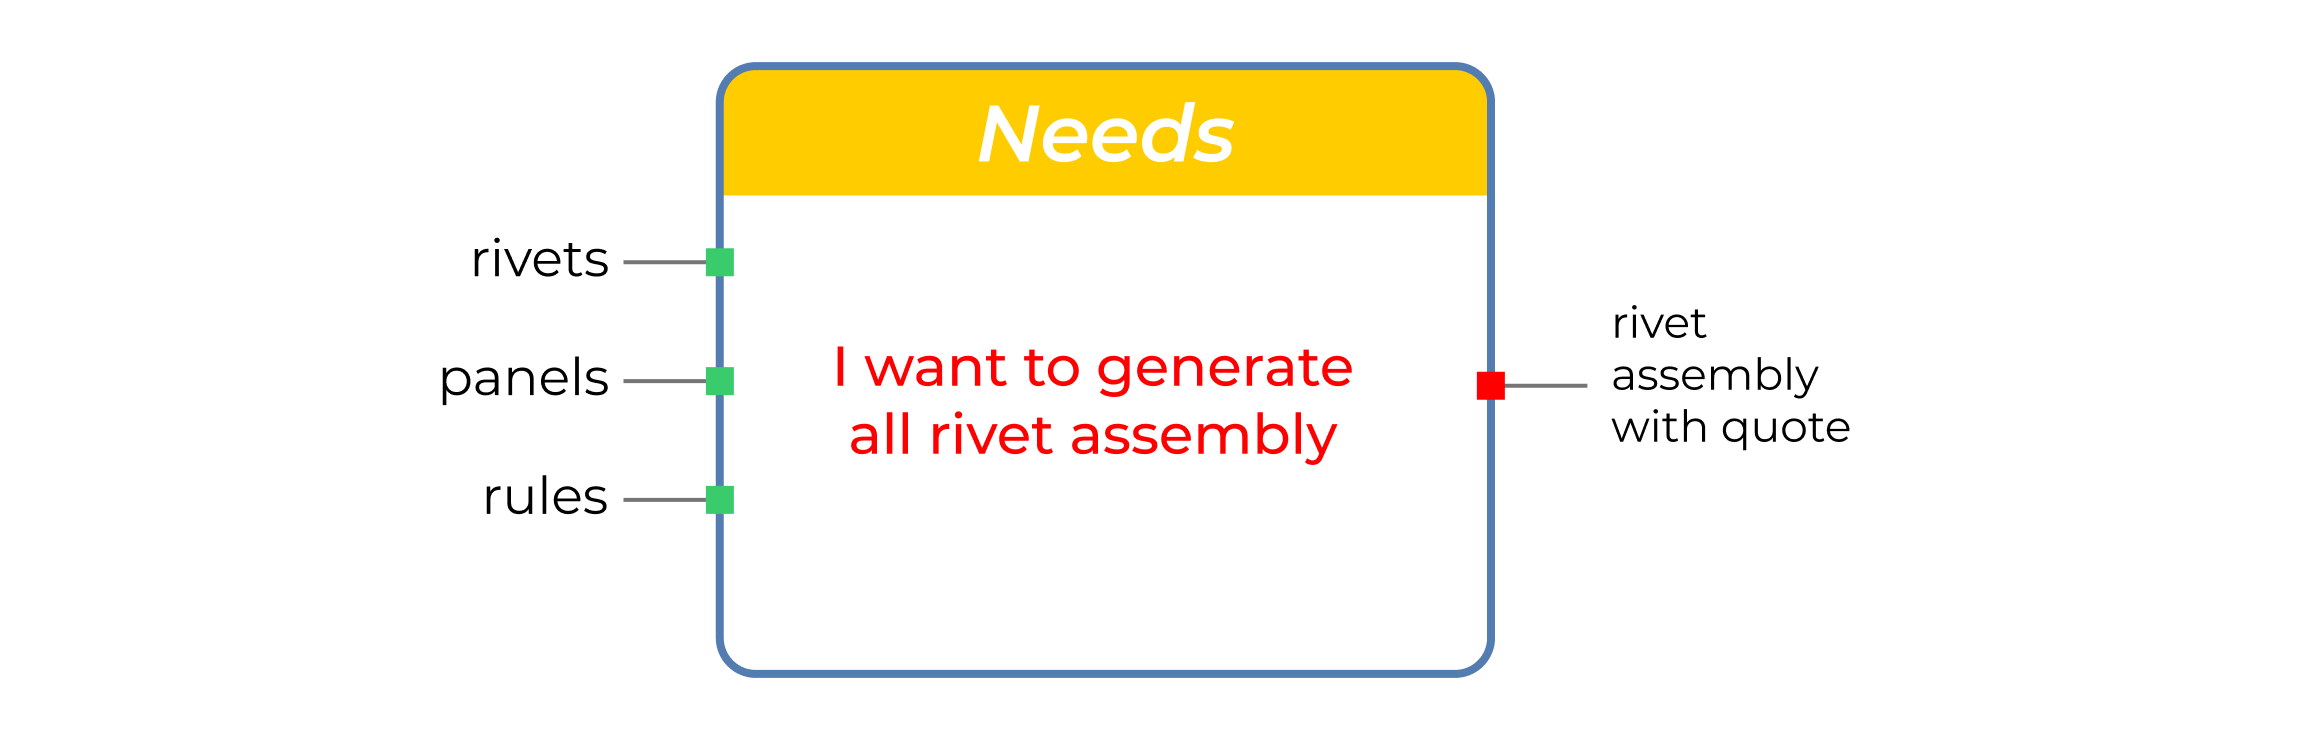
At this point, I list all needed inputs: for the current usecase the input is a sheet with all data needed to describe the rivets.
2.2 - How do I do normally it?
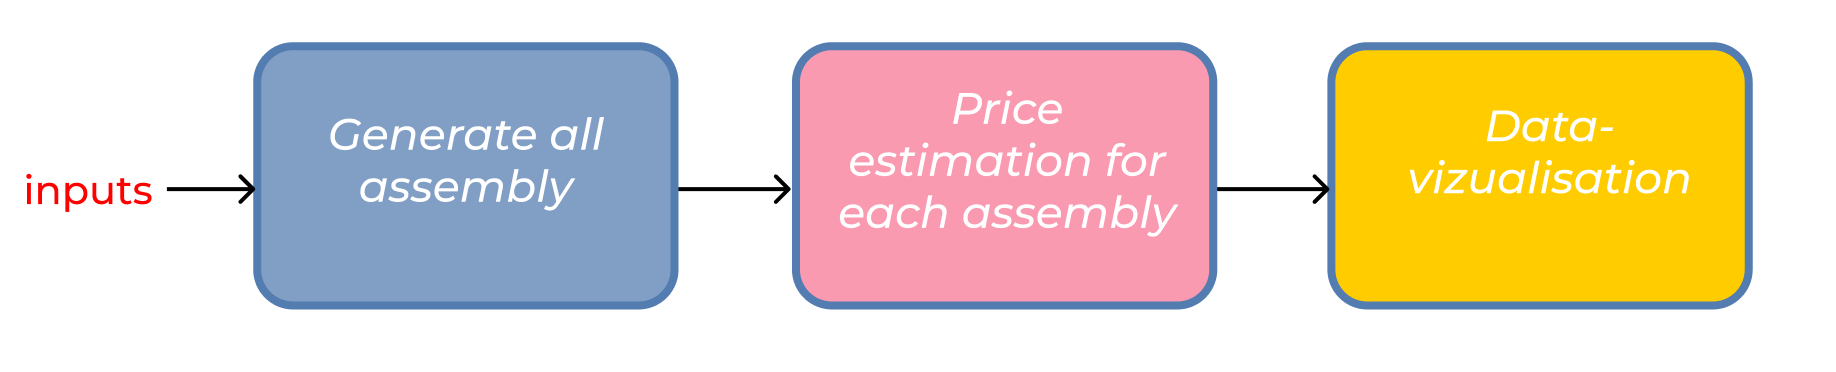
If I had to perform this kind of analysis, I have 3 different tasks: generating all assemblies, then quoting each assembly to visualize all assembly to choose the best scenario.
2.3 - What metric do I need?
To achieve the previous step, I need to determine a price for each rivet. With my feedback I can define a price with the following equation ('price_factor' is one parameter I know with my feedback) by applying a coefficient to the volume ratio between the rivet's raw volume and the rivet's volume. This price defines an energy cost to distort the rivet from a cylinder to its final shape.
.
In the same way, a reliability metric can be simulated based on 'factor_reliability' (depends on the feedback)
2.4 - How to organize engineering to define these metrics?
3 - How to build my bot?
First we use the DessIA methodology for bot development:
- Describe your engineering system
- Define engineering rules
- Create elementary generator & optimizer
- Build your workflow
We invite you to clone tutorials (opens in a new tab) and open tutorial1 to understand how it is built.
The script1_tuto1 is available in the script folder.
Before running script1, you should open a command prompt and change the directory to the tutorials folder and execute the following command:
python setup.py develop --user- It is possible that
pythondoes not work. In this case, you should replace by:python3orpython3.9orpython3.10If you have any trouble, please check 'Get Started' section and 'Installation'
3.1 - Describe your engineering system
First of all, we need to describe our problem by creating class, which are elements of our system.
class Panel(PhysicalObject):
"""
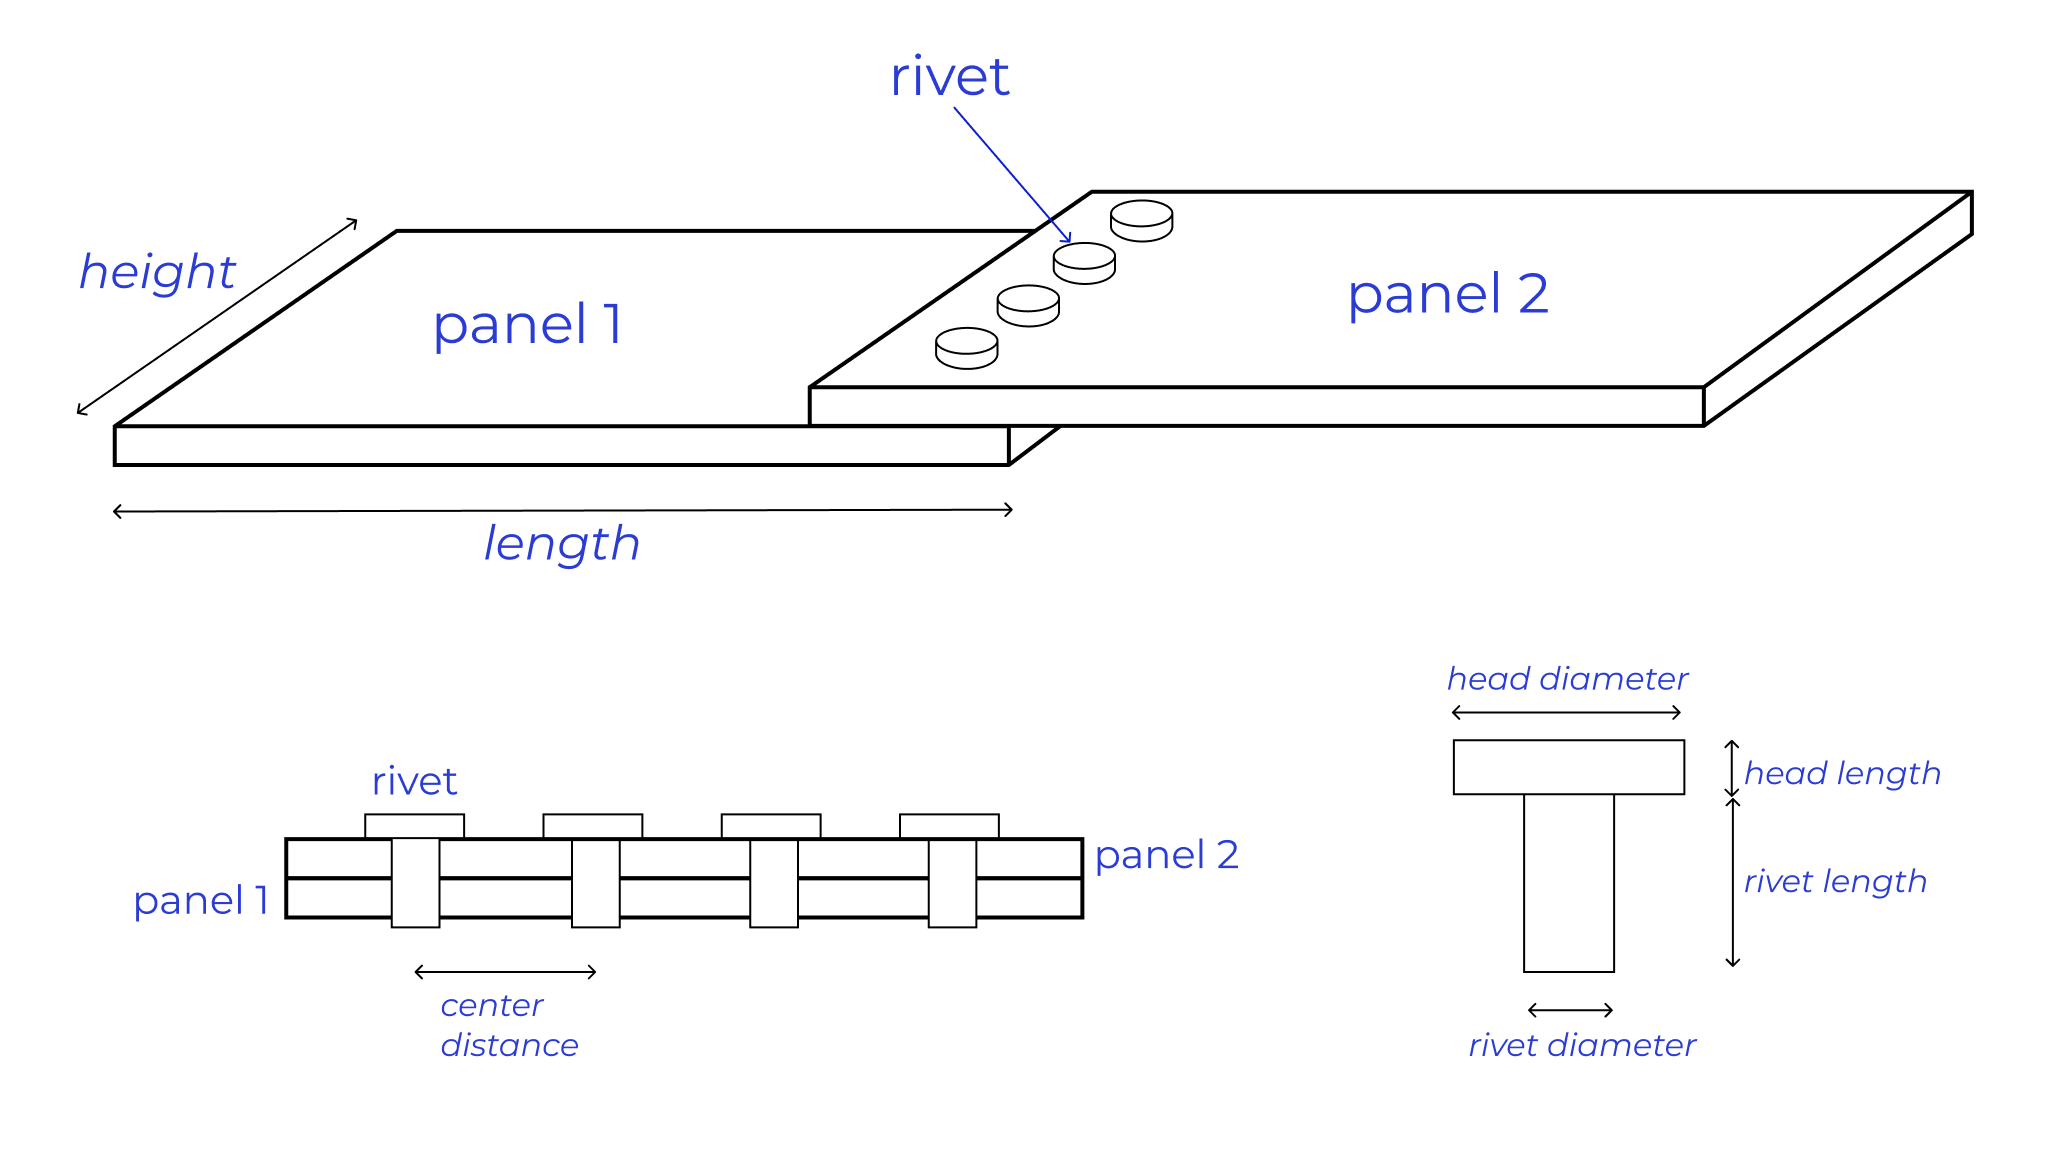
:param length: A value corresponding to the panel length.
:type length: float
:param height: A value corresponding to the panel height.
:type height: float
:param thickness: A value corresponding to the panel thickness.
:type thickness: float
:param name: The name of the Panel.
:type name: str
"""
_standalone_in_db = True
def __init__(self, length: float, height: float,
thickness: float, mass: float = None,
color: Color = Color(0, 0, 1), alpha: float = 0.3, name: str = ''):
self.thickness = thickness
self.height = height
self.length = length
self.mass = 7800 * (thickness * height * length) # If you want to change the volumic mass, change the '7800'.
self.color = color
self.alpha = alpha
PhysicalObject.__init__(self, name=name)class PanelCombination(PhysicalObject):
"""
:param panels: List of Panel representing a combination of panels.
:type panels: List[Panel]
:param grids: List of Point3D created with volmdlr representing each panel position.
:type grids: List[vm.Point3D]
:param name: The name of the PanelCombination.
:type name: str
"""
_standalone_in_db = True
def __init__(self, panels: List[Panel], grids: List[vm.Point3D], mass: float = None,
name: str = ''):
self.grids = grids
self.panels = panels
self.mass = sum([p.mass for p in panels])
PhysicalObject.__init__(self, name=name)class Rivet(PhysicalObject):
"""
:param rivet_diameter: A value corresponding to the rivet body diameter.
:type rivet_diameter: float
:param rivet_length: A value corresponding to the rivet body length.
:type rivet_length: float
:param head_diameter: A value corresponding to the rivet head diameter.
:type head_diameter: float
:param head_length: A value corresponding to the rivet head length.
:type head_length: float
:param name: The name of the Rivet.
:type name: str
"""
_standalone_in_db = True
def __init__(self, rivet_diameter: float, rivet_length: float,
head_diameter: float, head_length: float, mass: float = None,
name: str = ''):
self.head_diameter = head_diameter
self.head_length = head_length
self.rivet_diameter = rivet_diameter
self.rivet_length = rivet_length
self.mass = 7800 * (math.pi * (head_diameter ** 2) / 4 * head_length + math.pi * (
rivet_diameter ** 2) / 4 * rivet_length)
PhysicalObject.__init__(self, name=name)class PanelAssembly(PhysicalObject):
"""
:param panel_combination: The PanelCombination used as work base.
:type panel_combination: PanelCombination
:param rivet: The rivet used as work base.
:type rivet: Rivet
:param grids: List of Point2D created with volmdlr representing each rivet position\
in panel_combination intersection surface.
:type grids: List[vm.Point2D]
:param number_rivet1: An integer corresponding to the number of rivet in x direction.
:type number_rivet1: int
:param number_rivet2: An integer corresponding to the number of rivet in y direction.
:type number_rivet2: int
:param name: The name of the PanelAssembly.
:type name: str
"""
_standalone_in_db = True
def __init__(self, panel_combination: PanelCombination,
rivet: Rivet, grids: List[vm.Point2D],
number_rivet1: int, number_rivet2: int,
name: str = ''):
self.number_rivet2 = number_rivet2
self.number_rivet1 = number_rivet1
self.panel_combination = panel_combination
self.rivet = rivet
self.grids = grids
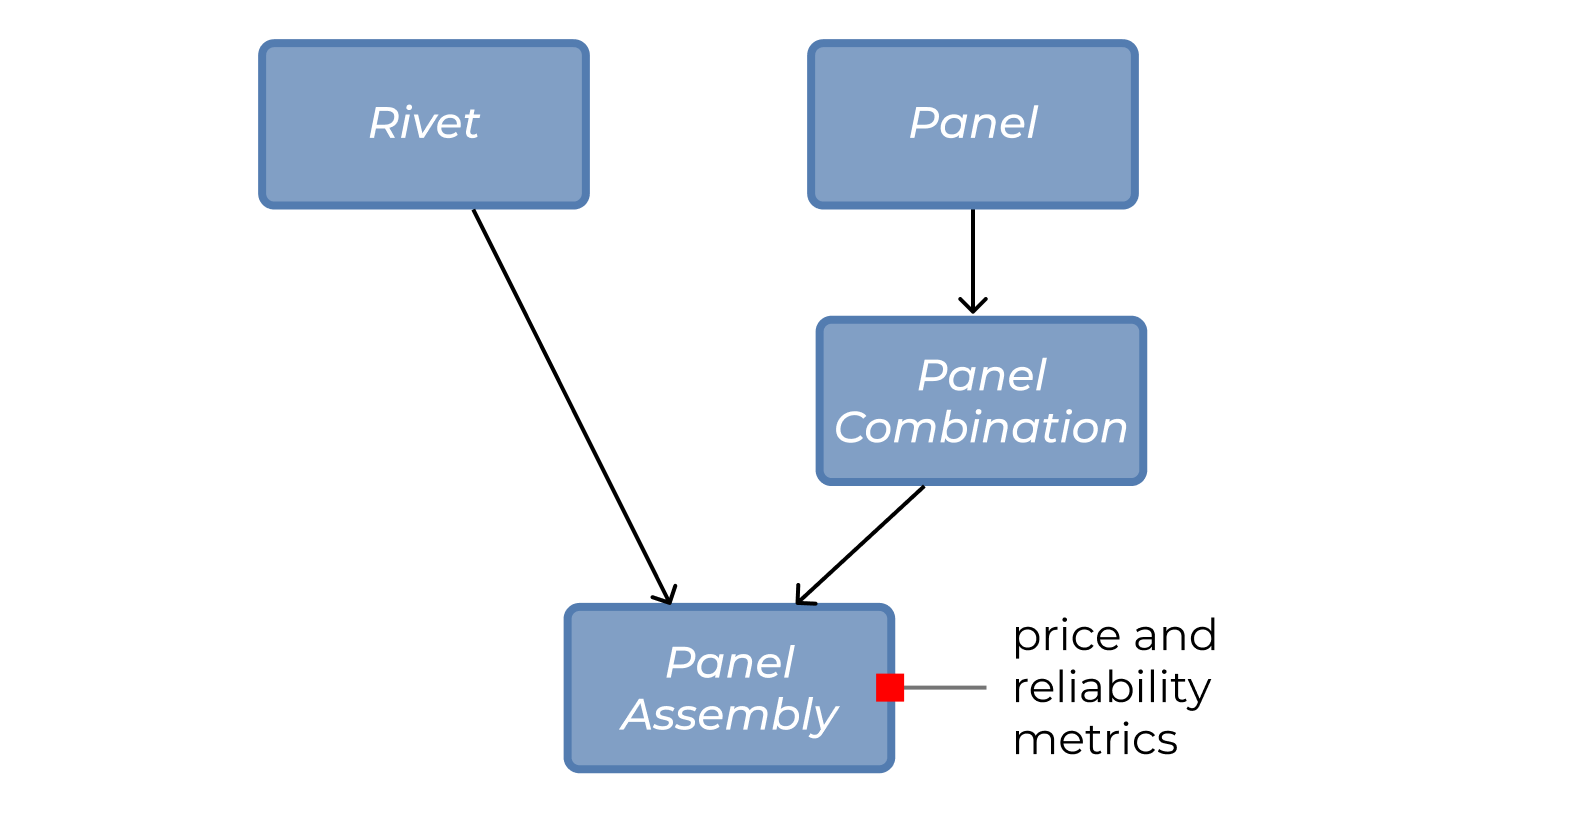
PhysicalObject.__init__(self, name=name)- Panel needs at least three inputs: length, height and thickness. These parameters are explained in the schema above. You have an example in the script1 with the variable p1.
- PanelCombination needs at least two inputs: list of panels, list of vm.Point3D which are generated thanks to volmdlr. The second list refers to the position of each panel's center. This method calculates the intersection area between the panels. You have access to the area in the variable sol.
- Rivet needs at least four inputs explained in the schema above. For more information, please check 'Get Started' section and 'Build your first bot'.
- PanelAssembly needs multiple inputs, for example: PanelCombination, the Rivet used, a list of vm.Point3D which references the position of each Rivet. These inputs will be filled in thanks to solutions generated by the Generator.
3.2 - Define engineering rules
Before generating solutions, we need to mention our rules to solve the problem which is the assembly of panels. Indeed, we need to define the number of rivets necessary for the assembly.
class Rule(DessiaObject):
    """
    :param minimum_ratio: A value corresponding to a ratio between rivet body diameter \
    and the maximal distance with another rivet.
    :type minimum_ratio: float
    :param maximum_ratio: A value corresponding to a ratio between rivet body diameter \
    and the minimal distance with another rivet.
    :type maximum_ratio: float
    :param name: The name of the Rule.
    :type name: str
    """
    _standalone_in_db = True

    def __init__(self, minimum_ratio: float,
                 maximum_ratio: float, name: str = ''):
        self.minimum_ratio = minimum_ratio
        self.maximum_ratio = maximum_ratio
DessiaObject.__init__(self, name=name)- Rule needs two inputs: minimum ratio and maximum ratio. These ratios will allow a calculation of all possibilities concerning the number of rivet in 'define_number_rivet' method. These ratios use methods known by field engineers.
minimum_ratio = diameter/maximum_distance_between_rivet
maximum_ratio = diameter/minimum_distance_between_rivet
3.3 - Create elementary generator & optimizer
It is time to generate all solutions which match with our specification.
class Generator(DessiaObject):
    """
    :param panel_combination: The PanelCombination used as work base.
    :type panel_combination: PanelCombination
    :param rivet: The rivet used as work base.
    :type rivet: Rivet
    :param rule: The rule used as work base.
    :type rule: Rule
    :param name: The name of the Generator.
    :type name: str
    """
    _standalone_in_db = True
    _dessia_methods = ['generate']

    def __init__(self, panel_combination: PanelCombination,
                 rivet: Rivet, rule: Rule, name: str = ''):
        self.rule = rule
        self.panel_combination = panel_combination
        self.rivet = rivet
DessiaObject.__init__(self, name=name)- Generator needs three inputs: PanelCombination, the Rivet use and rules. The ouputs will be a list of PanelAssembly. Each PanelAssembly will be a solution to the problem. You will have access to a 2D view in order to see all solutions available. Here is an example of solution.
3.4 - Build your workflow
The workflow1_tuto1 file is available in the script folder.
The best way to build a workflow is to use the workflow builder available on your platform. It is also possible to create the workflow through a script.
The following code defines elementary boxes. First of all, 'tutorial1_rivetedassembly' module is imported as well as the 'dessia_common.workflow' module to be able to create a workflow.
The first block is the 'block_generator' in which we instanciate a Generator block. Then with the 'block_generate' block we run the 'generate' method of the Generator block. And with the 'display_reductor' block we define the data-visualization interface. (Relevant parameters are defined in a list called "list_attribute". This list is then set as a parameter of the function that generates the "display_reductor" block).
import tutorials.tutorial1_rivetedassembly as tuto
from dessia_common.workflow.blocks import InstantiateModel, ModelMethod, MethodType, MultiPlot
from dessia_common.workflow.core import Workflow, Pipe

block_generator = wf.InstantiateModel(tuto.Generator, name='Generator')
method_type = wf.MethodType(class_=tuto.Generator, name='generate')
block_generate = wf.ModelMethod(method_type=method_type, name='generate')

list_attribute1 = ['number_rivet1', 'number_rivet2', 'number_rivet', 'mass']
display_reductor = MultiPlot(selector_name="Multiplot", attributes=list_attribute1, name='Display Rivet Assembly')
Next, 'block_workflow' is defined as the list of all the blocks needed, along with 'pipe_worflow' which creates every pipe. The last line defines the 'workflow' with 'block_generate.outputs[0]' the output port of the workflow (the display block doesn't have any output port).
block_workflow = [block_generator, block_generate, display_reductor]

pipe_worflow = [wf.Pipe(block_generator.outputs[0], block_generate.inputs[0]),
                wf.Pipe(block_generate.outputs[0], display_reductor.inputs[0])]

workflow = wf.Workflow(block_workflow, pipe_worflow, block_generate.outputs[0])
To check if the number of ports is ok, you can run the following command on the Python console:
workflow.plot()and you see the following figure

By reading the name of an input port, you can easily check the port number.
Then, the workflow is run with Python after defining an 'input_values' dictionary that uses the same port number convention as previously defined. (A dictionary has the following structure: {key1: value1, key2: value2, ...}). Only the green ports are mandatory since a default value, which is the value taken as input if none has been set, has not been defined. Let's take the example of the Generator class. The class constructor has the following inputs: "panel_combination: PanelCombination,
rivet: Rivet, rule: Rule, name: str = ' ' ". The "name" parameter has a the default value " ' ' " which means that no name has been given when instantiating a generator block, it will automatically be set to " ' ' ". However, "panel_combination" doesn't have any default value which is why defining it is mandatory. The last line
execute the workflow with the 'input_values' variable.
import volmdlr as vm

p1 = tuto.Panel(1, 1, 0.01)
p2 = tuto.Panel(1.1, 1, 0.01)
r1 = tuto.Rivet(0.01, 0.05, 0.012, 0.005)
pc1 = tuto.PanelCombination([p1, p2], [vm.Point3D(0, 0, 0), vm.Point3D(0.7, 0.2, 0.01)])
rule1 = tuto.Rule(0.1, 0.2)

input_values = {workflow.input_index(block_generator.inputs[0]): pc1,
                workflow.input_index(block_generator.inputs[1]): r1,
                workflow.input_index(block_generator.inputs[2]): rule1,
                }

workflow_run = workflow.run(input_values)
A workflow is what we call a 'bot' and 'workflow_run' is the result generated by the bot.
You can upload your workflow into your DessIA cloud instance. For more information please check 'Get Started' section and 'Upload your bot'.
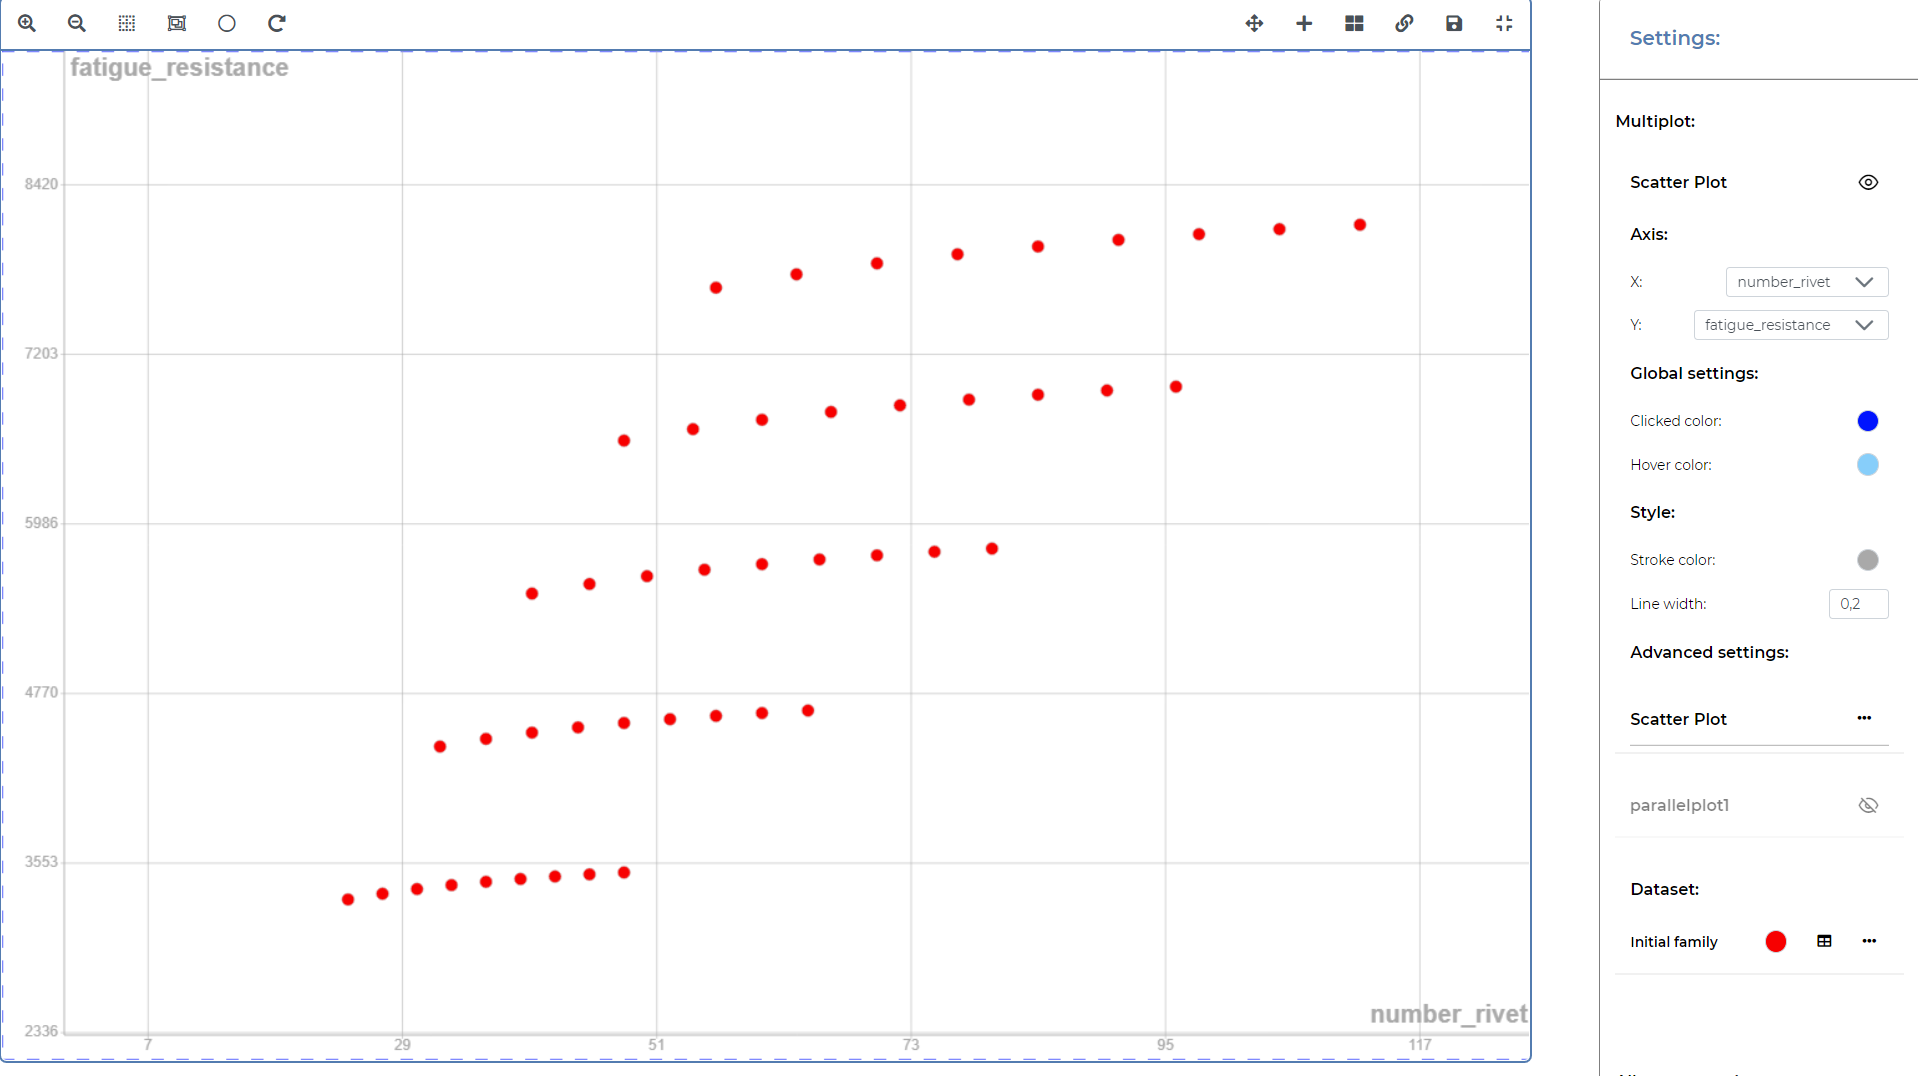
4 - How to choose the best solution?
In the tutorial1_rivetedassembly.py code, we have defined two methods: _pressure_applied and _fatigue_resistance.
Indeed, we have decided to express solutions thanks to fatigue resistance, which is a pertinent way to choose the best solution.
First of all, the rivets used are tested with a force of 5 Newtons. Experiments showed that rivets had a fatigue resistance of about 5000 Hours if there is, at least, a distance of 4.5 times the rivet head diameter between each rivet. By dividing the force applied by the rivet surface, we have the pressure applied during this experiment.
Now, we would like to apply a force about 100 Newton on the assembly. By knowing how many rivets are present in the assembly, we can determine the pressure applied on each rivet thanks to _pressure_applied method. Thanks to algorithm, we can determine the minimum_distance between each rivet in each solution. Now, we create 2 ratios concerning: pressure and distance between each rivet. These ratios allow us to know the characteristics imposed to rivets in assembly regarding characteristics used during experimentation. We apply a security coefficient of about 3.
Then, we have the fatigue resistance versus the number of rivets determined by experimentation, the 2 ratios and security coefficient.
By imposing your specification concerning your assembly, you have multiple choice. Results below show a Pareto front.