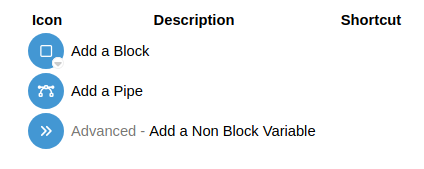
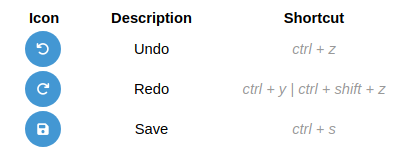
Use the workflow builder
One of the main features of this platform is building workflows. Once you have defined your classes and methods, you may want to start combining them to generate objects or test your process. It is important to start this process as soon as possible during your bot design, even for a simple workflow like the Knapsack Problem, as it will allow you to introduce your classes and concepts to the platform and ensure everything is going smoothly as you progress through your bot definition and specification.
1. A first look at the GUI
When you open a new, empty workflow, you should see this page:
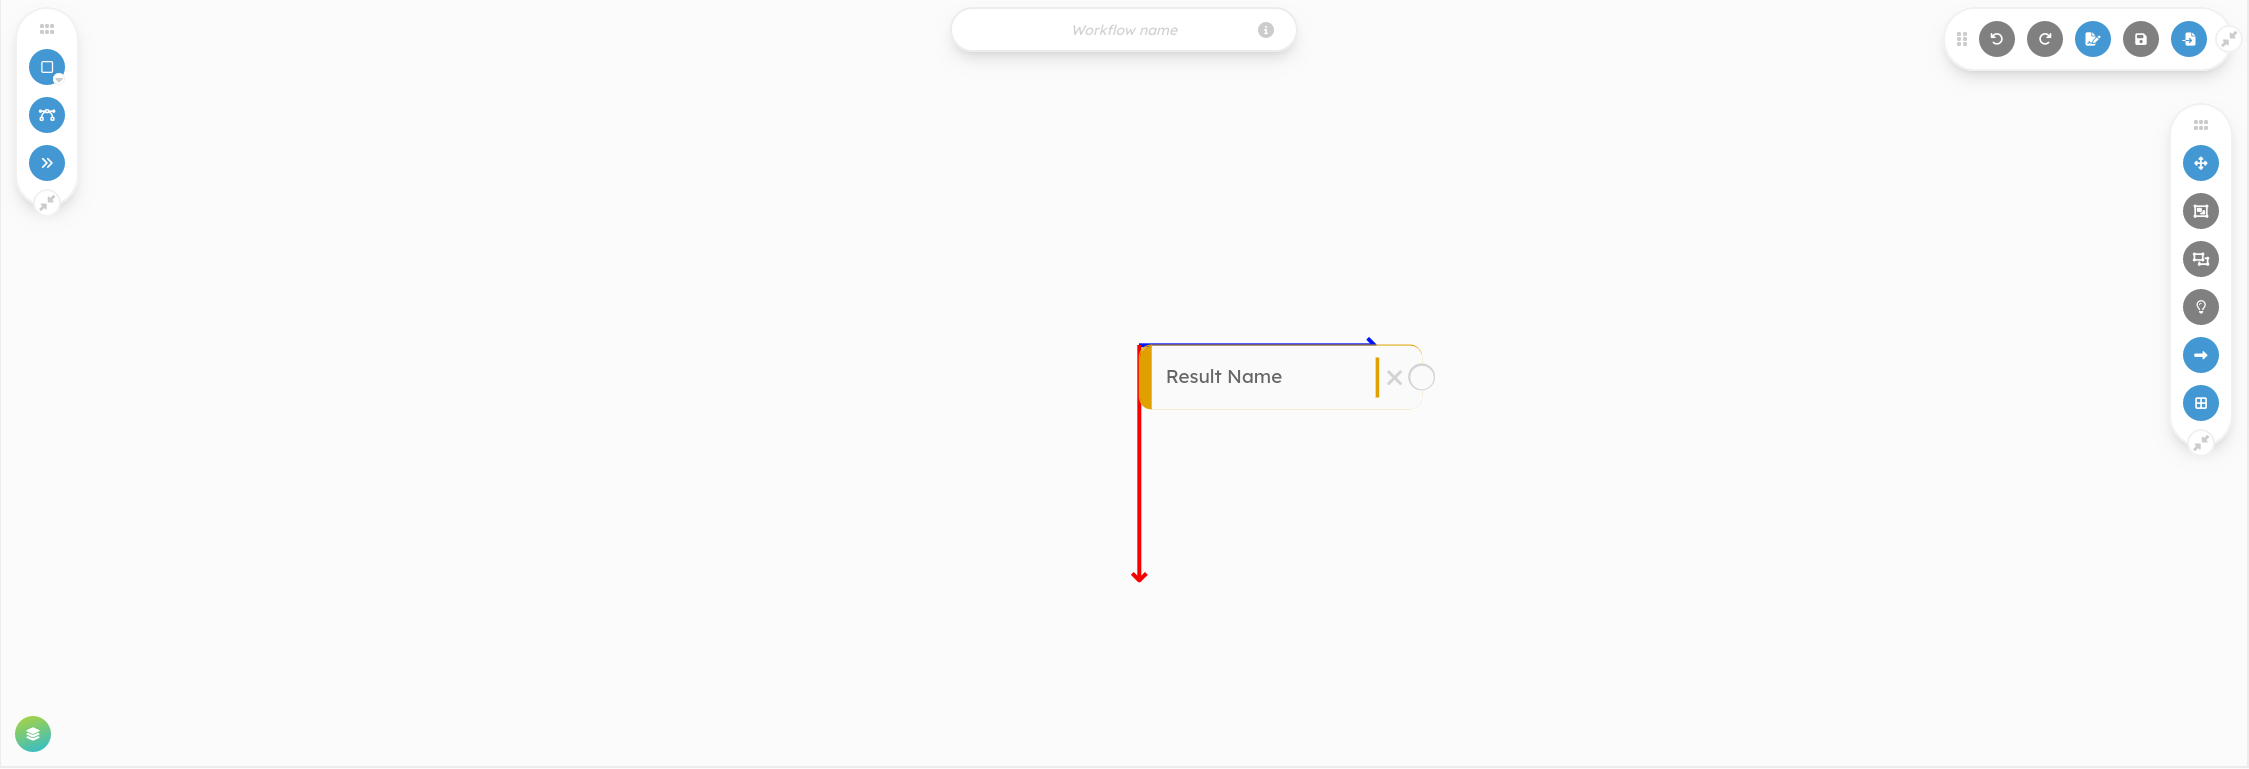
Note that there is already an element there, which is a variable named "Result Name". When you will run this workflow, you will be asked to set it as an optional input. It enables you to cast your WorkflowRun name in different blocks and inject it into your objects, methods, and overall process, for example to tag the objects you are creating. For now, you can ignore it, or even erase it if you wish. It will be automatically reset when saving.
Without adding anything yet, you can move the different menus around, fold or expand them. Let’s have a look at them and their purposes:
- This is where you enter your workflow name. When you save your work, the created object will be named after it. It is mandatory to fill it in order to save your workflow.
- As mentioned before, this is a variable you can use in your workflow. It represents the name of the result of your workflow when you run it (See the Run a Bot chapter).
- General handling buttons

- Nodes handling menu
- Actions menu
- Advanced - Open Workflow Database. This option enables you to drag and drop other workflows into your current one as a WorkflowBlock to perform, for example, an iterative task over several objects.
- The whole rectangular area is your playground. Add blocks, draw pipes, move things around, and right or double-click on everything to discover more advanced features!
2. Add your first display
2.1. InstantiateModel
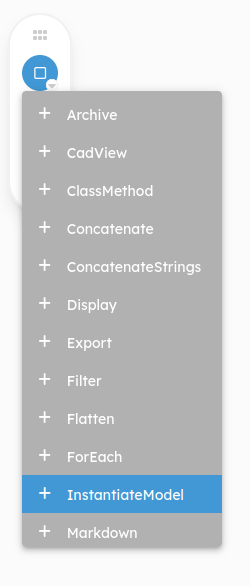
By clicking on the corresponding icon, you will be prompted to select the type of block you want to add. There are many options, from instantiation and mathematical calculation to display and export.
For now, we will focus on simple blocks that are adapted to the Knapsack Problem, but you will soon learn how to handle more advanced blocks. You may even create your own!
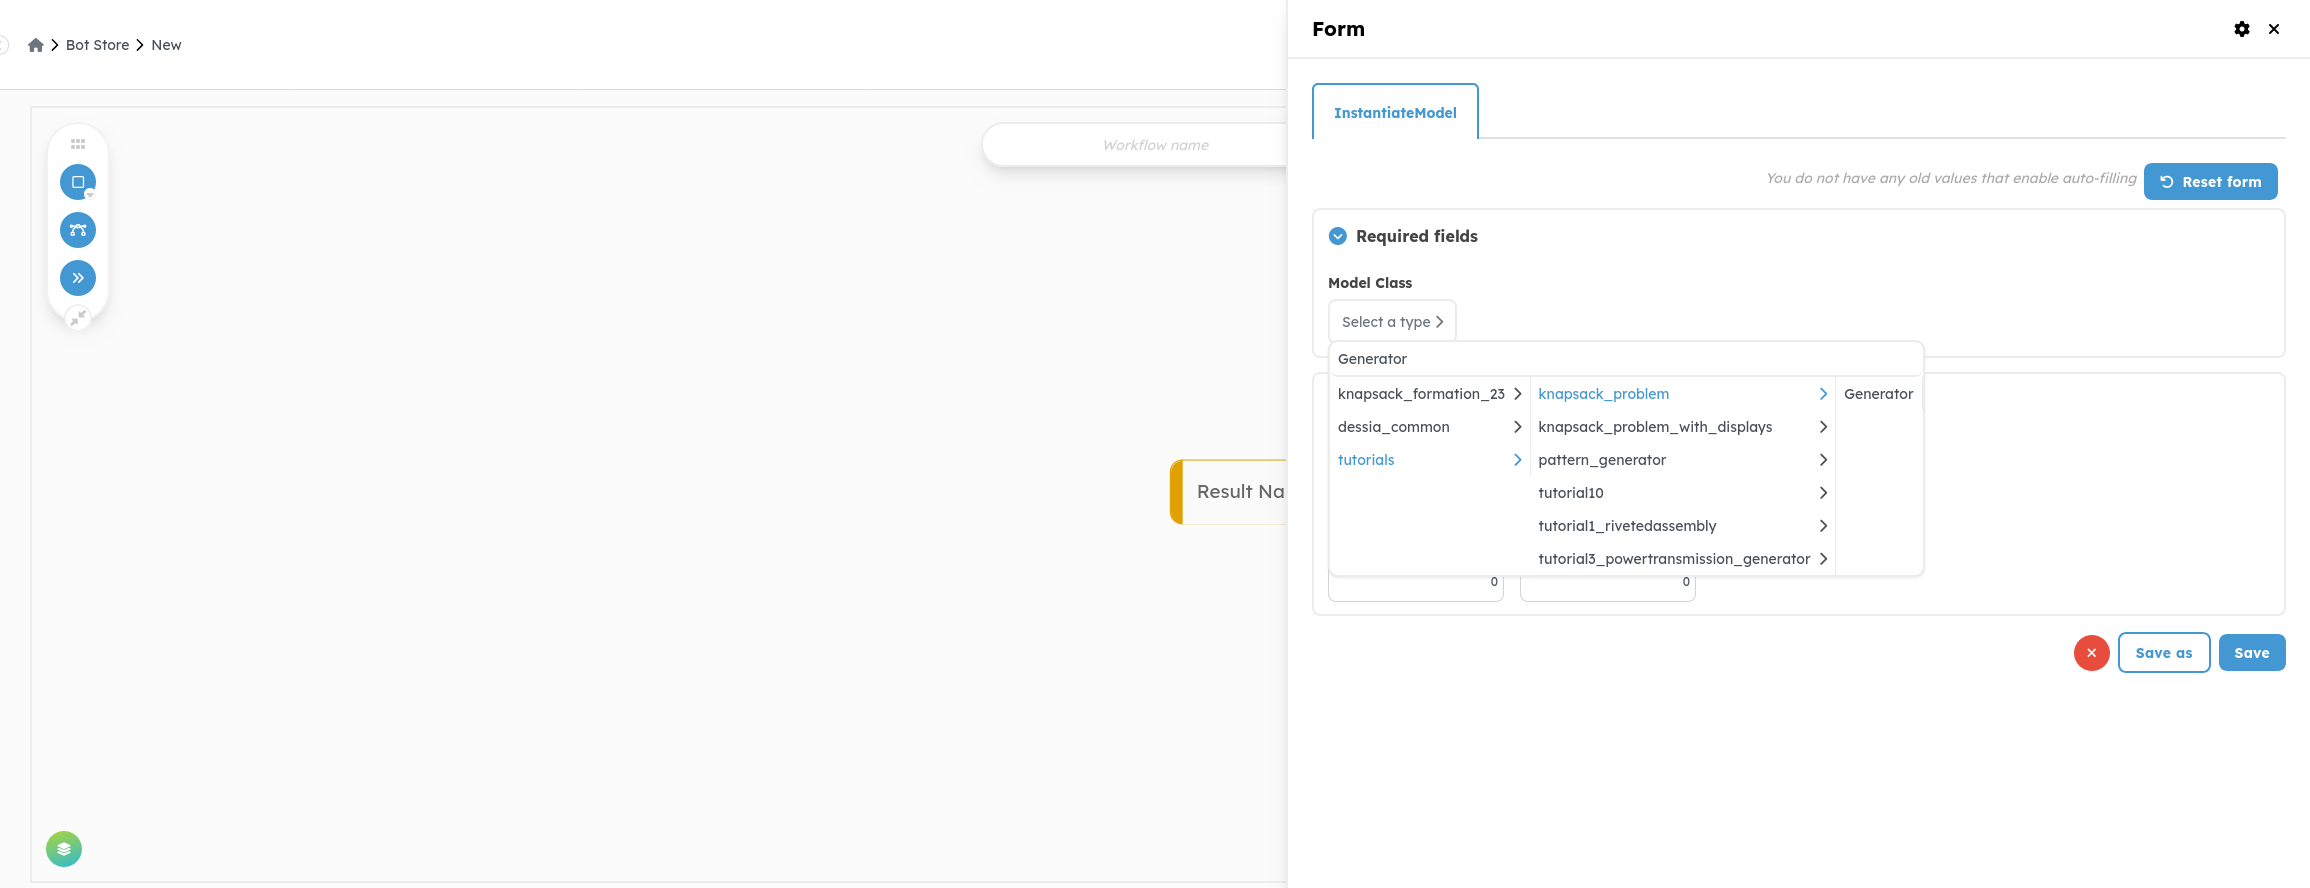
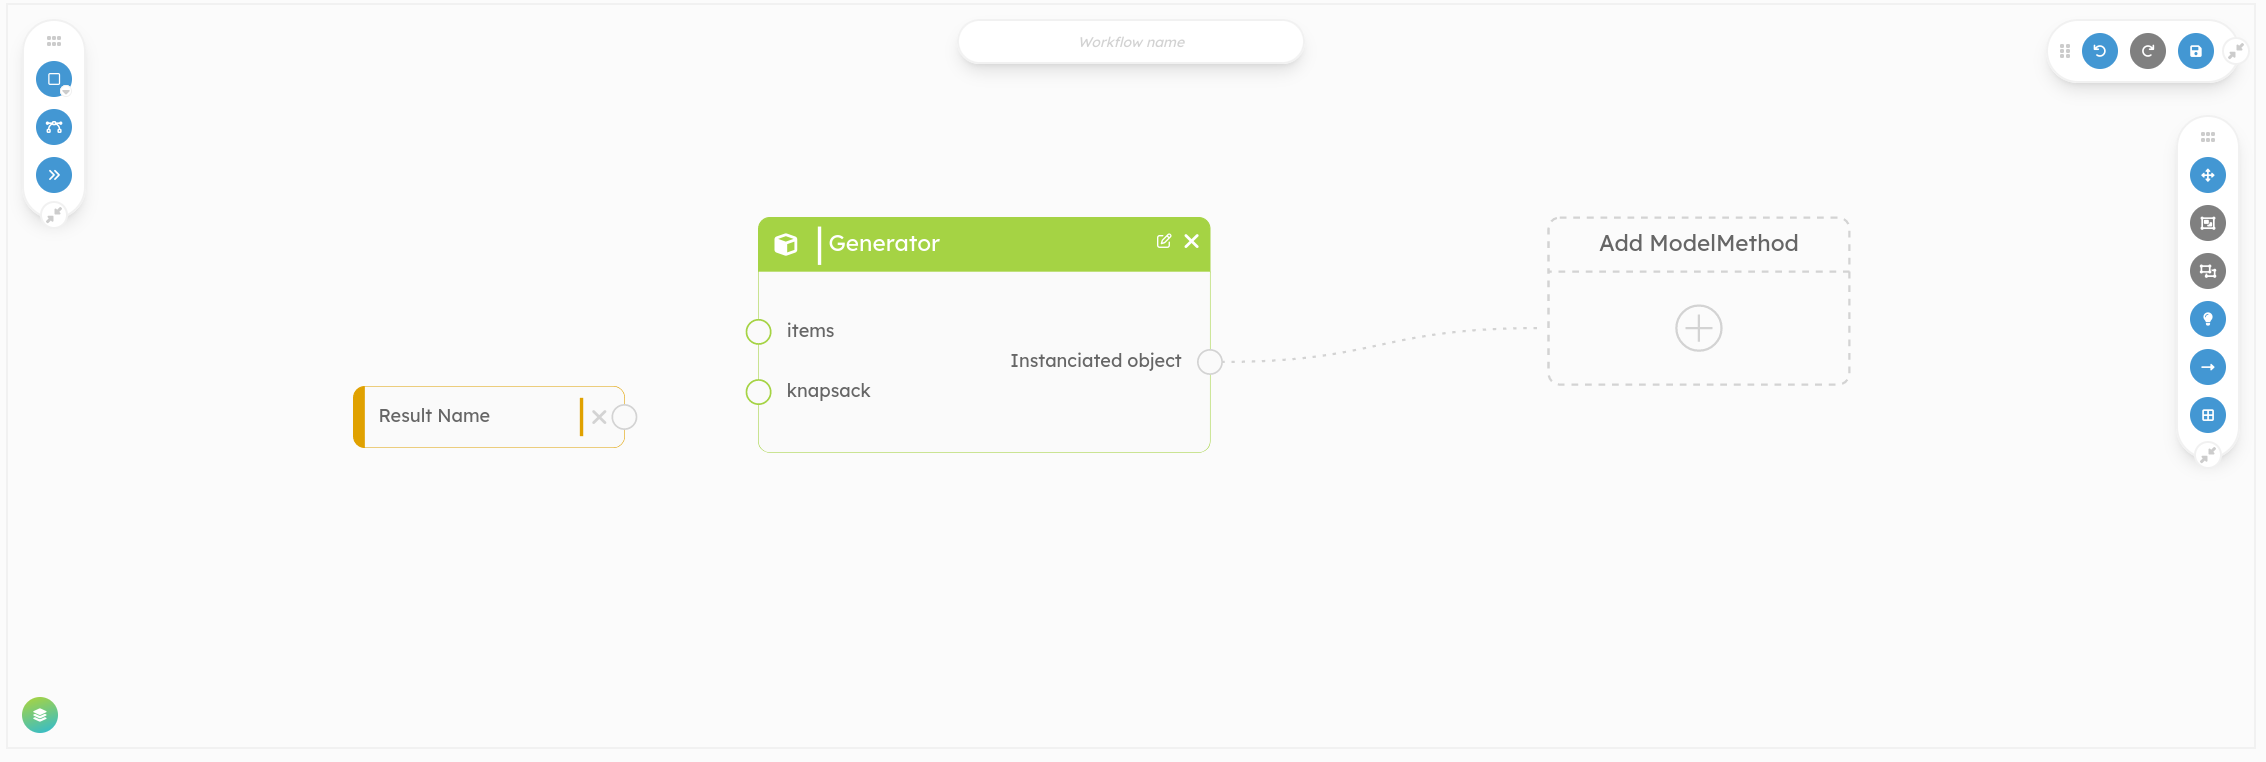
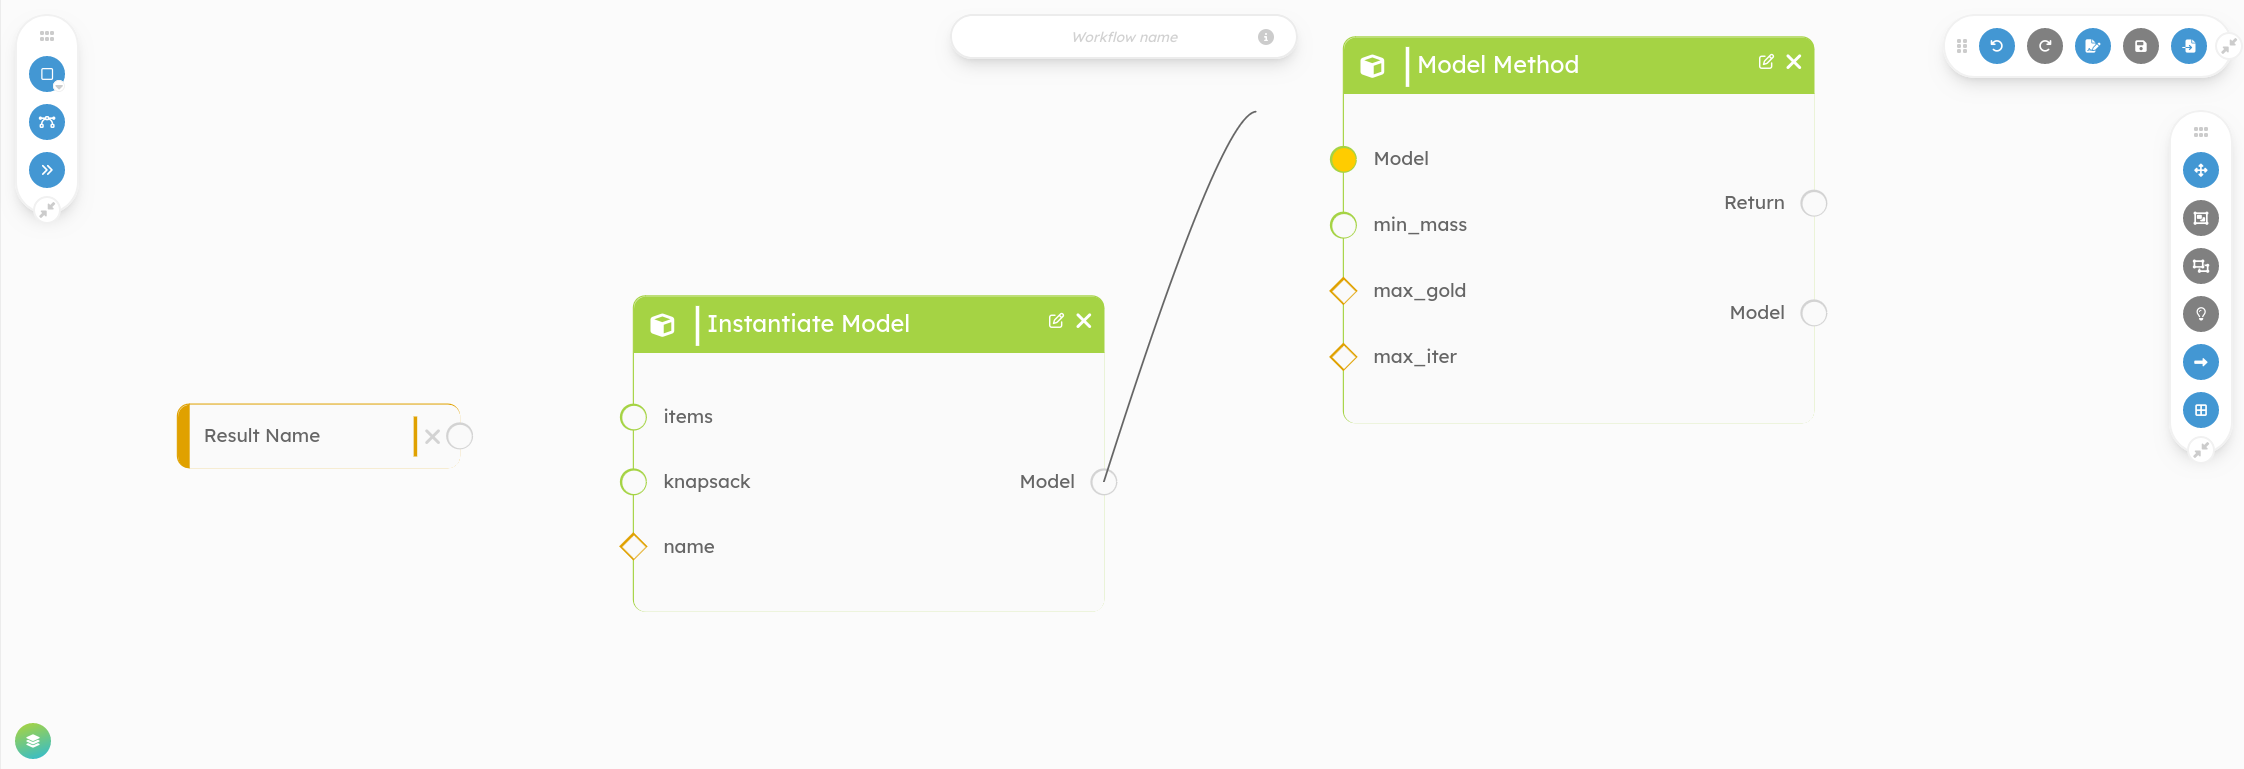
Select the InstantiateModel block. The sidebar will open, showing the block configuration options. This block takes a class as its configuration along with some other inputs:
- Block name: Although optional, it can be important in some cases and helps with complex workflows. So, always remember to give awesome names to your blocks!
- Position: It is purely optional, and you can ignore it for now. Your block will be added at the given canvas position, which defaults to the center of the workflow's bounding box.
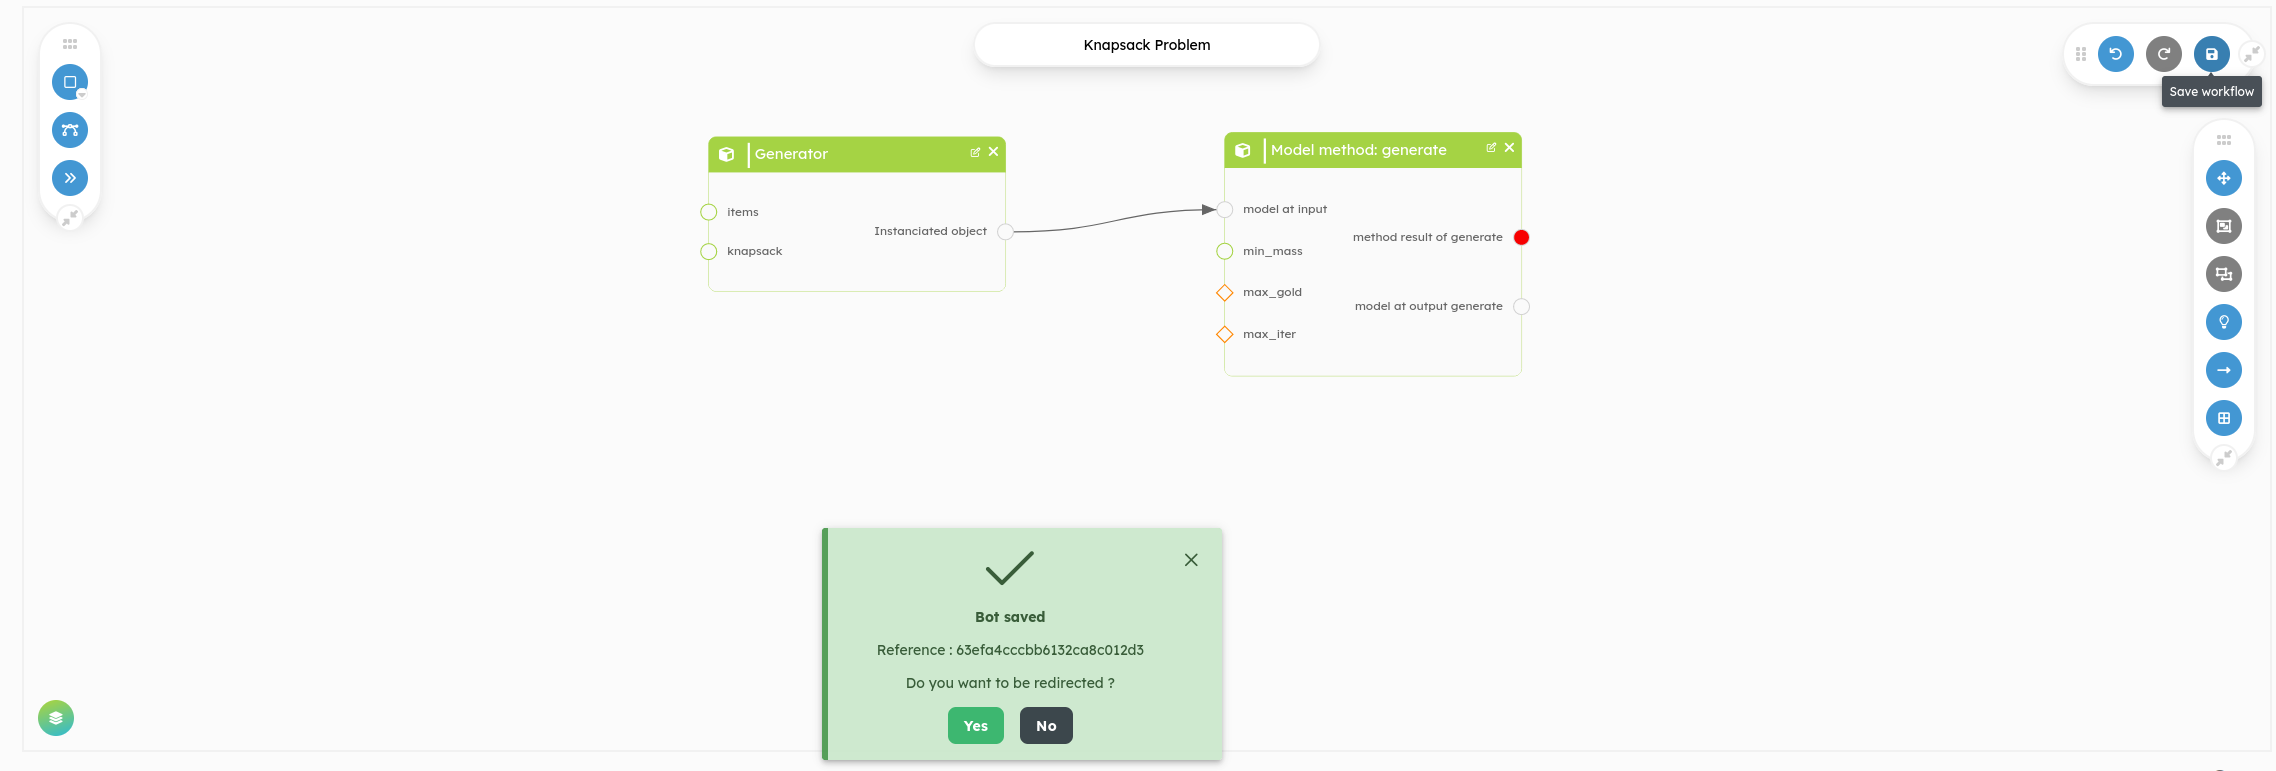
Select the knapsack’s Generator class and confirm the dialog. You can use the search in order to look for the class if you have trouble finding it.
The block should appear at the center of the screen.
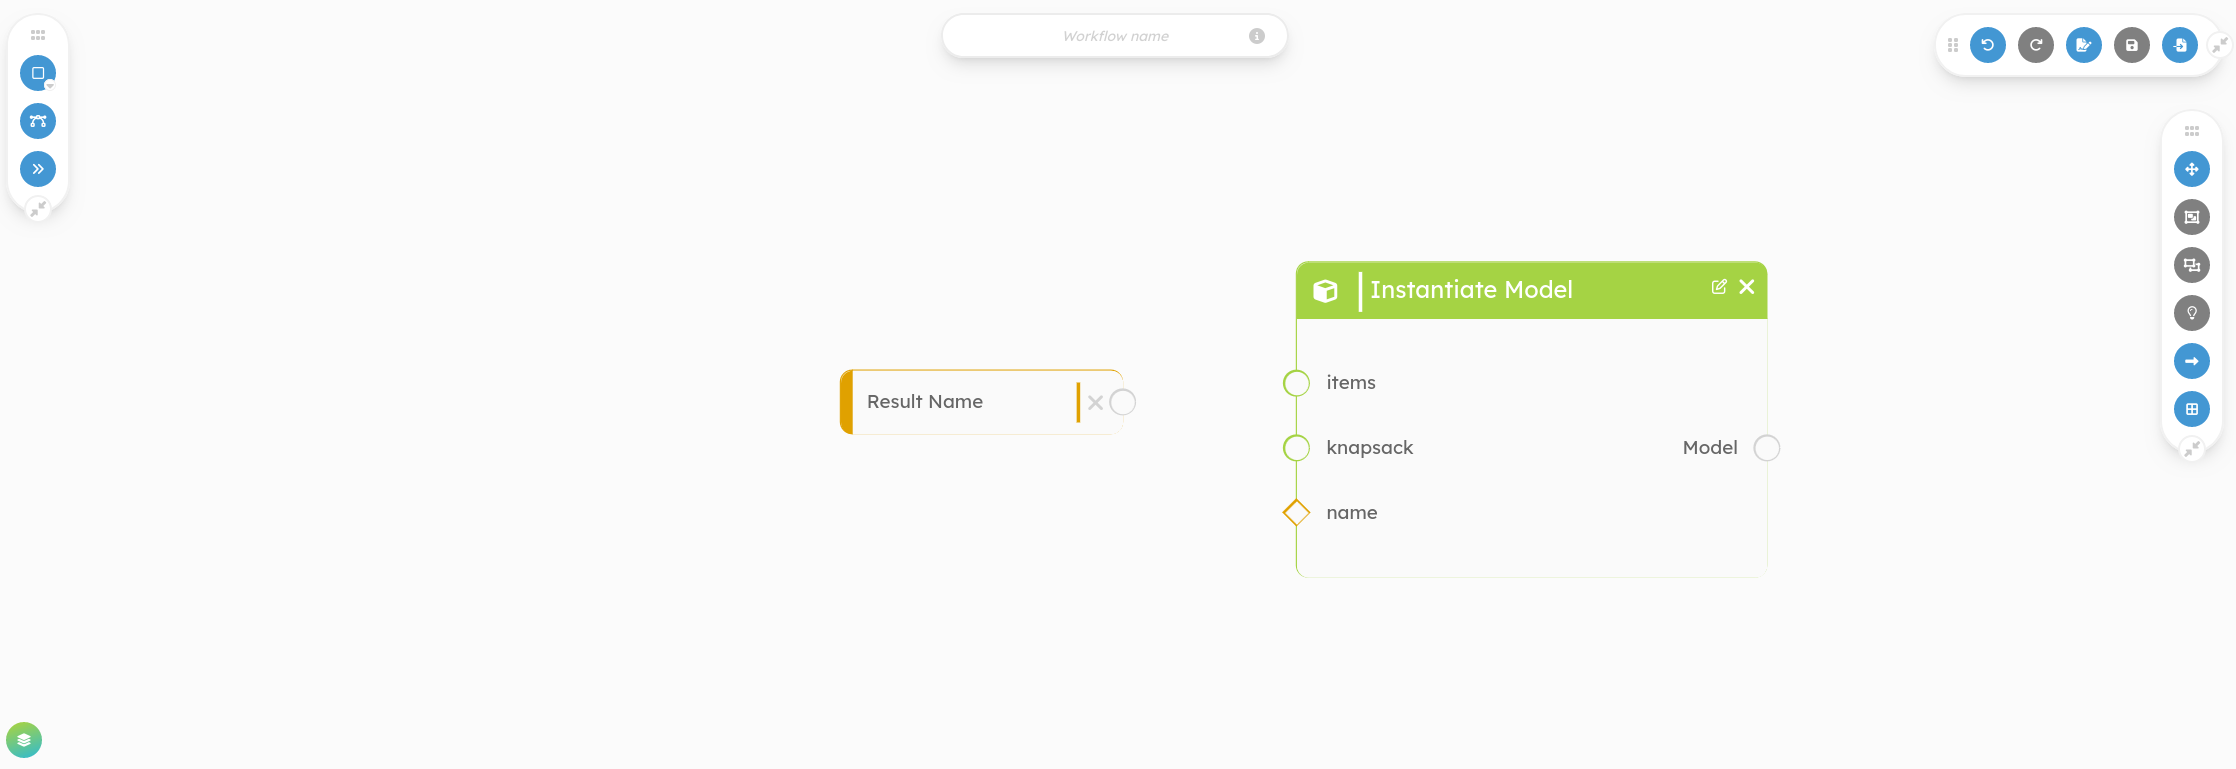
You can see that it has been configured with all the inputs you need in order to instantiate your Generator object:
- Green inputs are mandatory and will be inside the "Required" part of the run form.
- Orange inputs are optional and will be inside the "Optional" part of the run form.
- Gray inputs are internal variables and will appear grayed out when a pipe is connected to them.
- Black inputs are imposed variables and will be removed from the run form.
The output of your block is the instantiated object of the given class.
However, you still need to generate solutions by evaluating the generate method of your Generator. To do this, you need to add a new block that takes a Generator as input and specifies which method you want to evaluate.
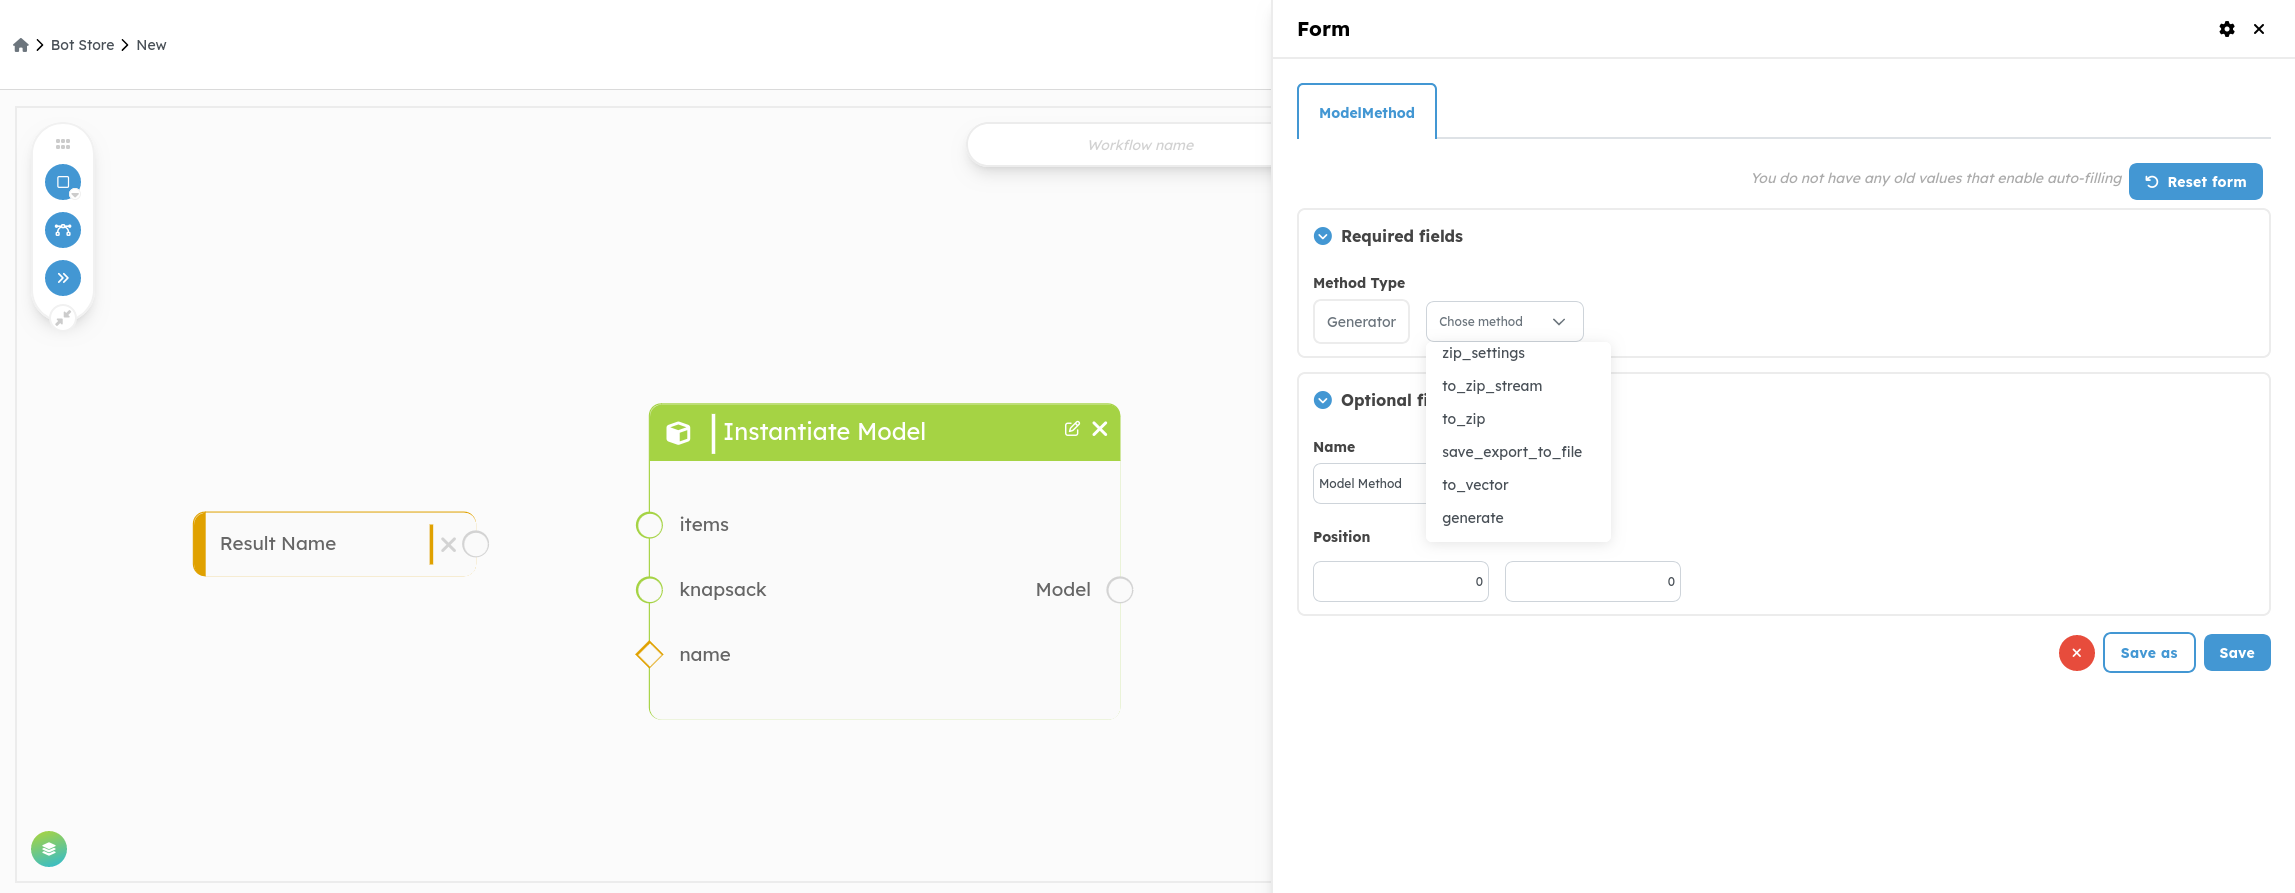
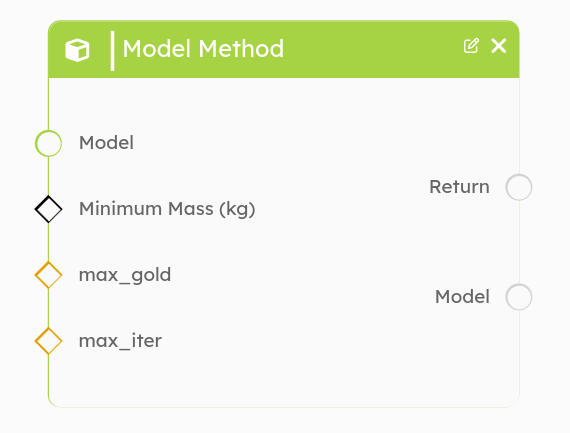
2.2. ModelMethod
The block we are referring to is a ModelMethod. It is configured with a class name and a method name, both available from the methods defined by the given class.
To add this block with the Generator class and the generate method, click
the Add Block button again.
You should see the second block appear next to the first one.
Alternatively, you can toggle the suggestion button. After an InstantiateModel block, a ModelMethod block pre-configured with the correct class is automatically proposed. Other suggestions will be available in the future!
Note : the “suggestion” feature has been temporary disabled while it is improved
Let’s take a moment to examine this new block.
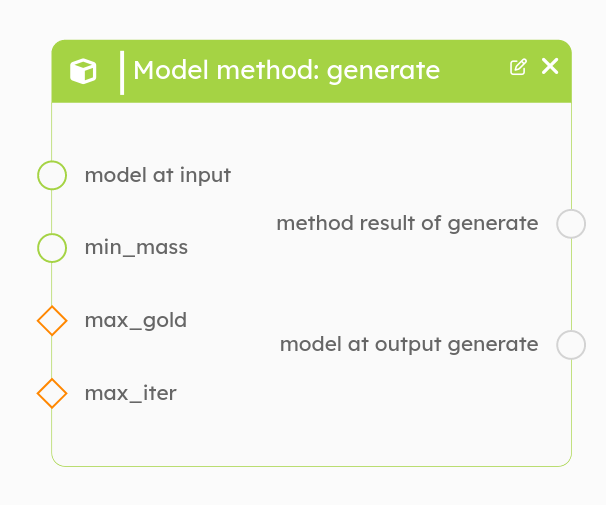
It has 4 inputs, 2 required and 2 optional.
- Inputs
min_mass,max_gold&max_iterare part of the generate method signature, and are similar to those defined in Python. - The first input,
Model, is the object on which you want to evaluate the method. In other words, as we want to run thegeneratemethod of a Generator object, this is the output of the block we previously created. We will draw a pipe between these two blocks afterwards.
Before that, let’s have a look at the outputs. Unlike most blocks, this one has two.
Returnis strictly equivalent to Python'sreturn. What comes out of this output is what is returned by the python method. It allows you to cast the method result into other blocks with a pipe.Modelis equivalent to Python'sself. It is the instance on which the method is called. It allows you to cast the Generator object into other blocks with a pipe.
Draw a pipe by dragging your cursor from the output of the Generator to
the right input of the generate method block.
Notice how an input is highlighted if it is type-matching the variable being dragged. This might help you find which variables are compatible. Be aware that a port not being highlighted does not mean the two variables are not compatible, but if it does, types are necessarily compatible!
3. Configure your inputs
A nice way to improve the readability of your workflow is reconfigure your inputs. By default, their names and default values are those defined by the python code, which can be cumbersome. Right click on the input you want to configure and select Configure port or Double click on the port.
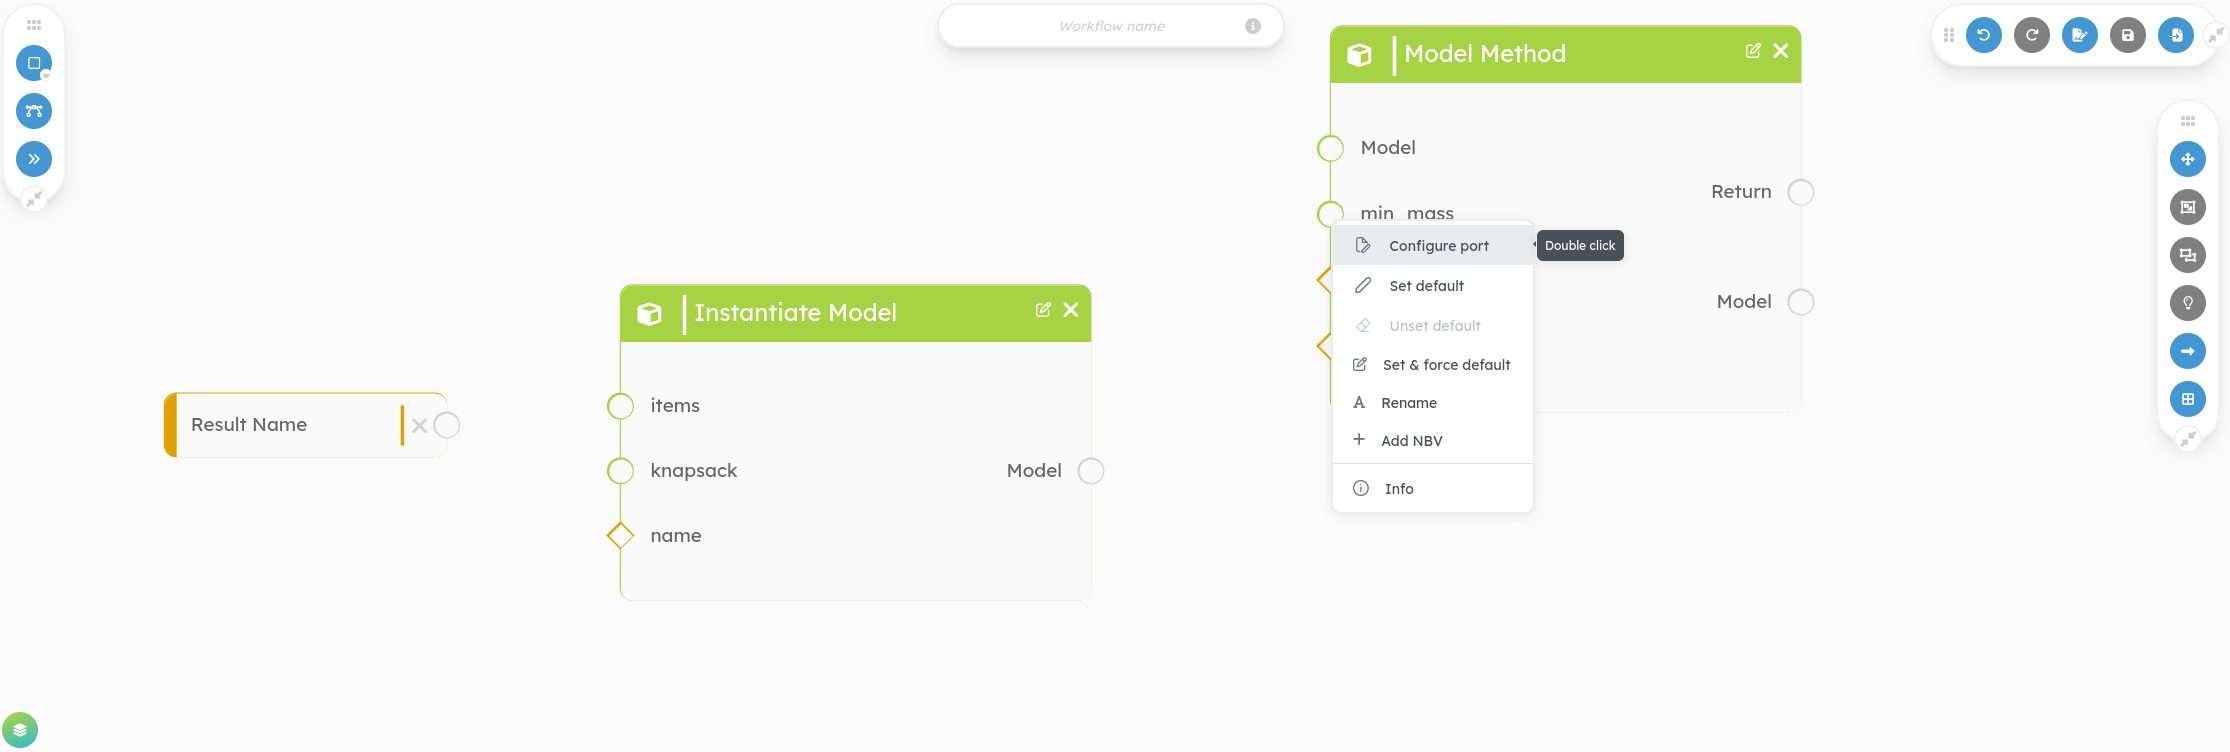
This enables you to configure these three elements :
- Port Label : You can enter any string you want here. This will increase readability in the Workflow Builder as well as when you will finally want to run your bot. This is particularly useful in complex workflow with nested blocks, where the default variable name shown in the submit form is a concatenation of the parent block names and the actual variable name. While it enables you to custom the label, it does not change the variable name in the python code.
- Default Value : Set or modify the default value.
- Impose Default Value : You can force other users to run this bot with the defined default value. This is useful for certain application field. For instance, if your bot is about launching rockets, you could have a parameter for the free-fall acceleration (g) that you want to keep enabled in your code, but disabled when the bot is ran on the platform. By setting it to 9.81 and forcing its default value, you then set your bot to specifically launch rockets from the Earth and not from any other celestial body. Another workflow would be required to launch from Mars, for example. Use this when you want to decrease the number of inputs shown in the submit form and some inputs are not to be changed in your current application.

Notice how the input change its shape and color according to its state when you configure it.
4. Save your workflow
You are almost all set up! You just need to select an output for the workflow. To do this, either double-click on the desired output or right-click, then choose the Set as workflow’s output option. It will be highlighted in red.
To save your work, ensure that you have given an awesome name to your workflow.
Then, click on the Save button or press CTRL + S to store the workflow in
the database.
Run it by following the instructions in the Run a Bot chapter.
Congratulations! Your workflow is now available in the Bot Store!